Search the Community
Showing results for tags 'modding'.
Found 6 results
-
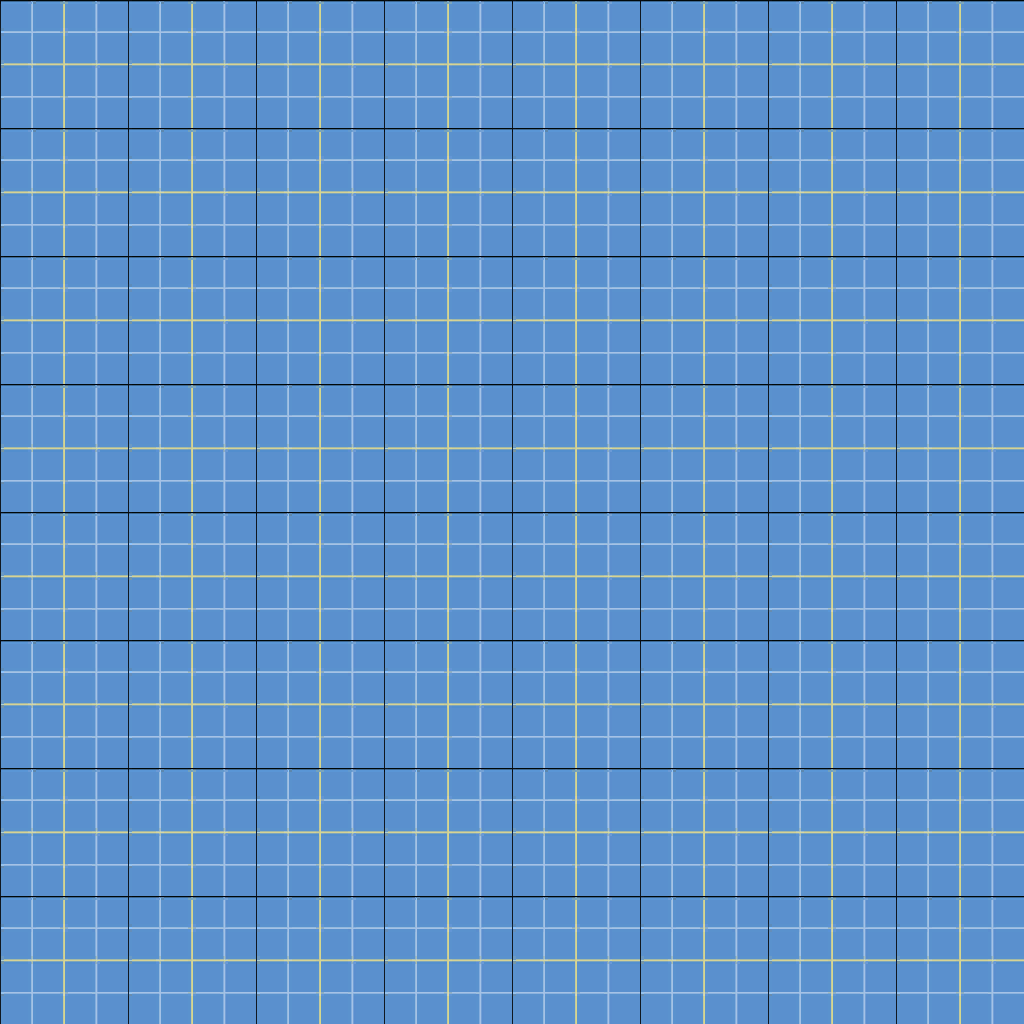
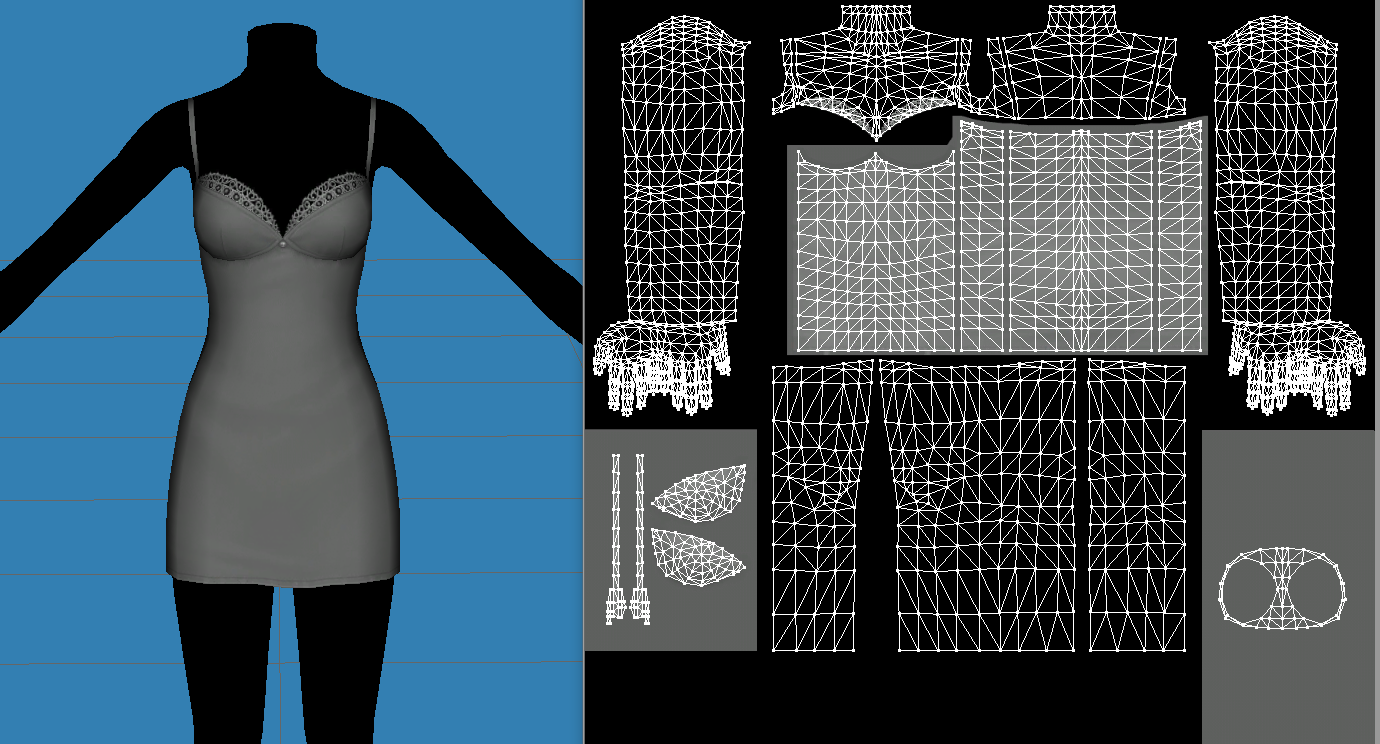
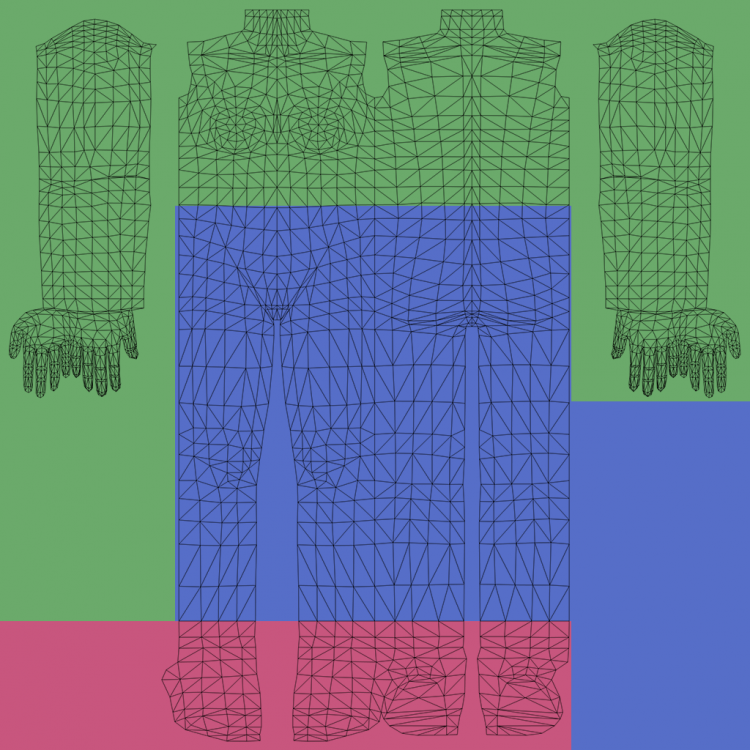
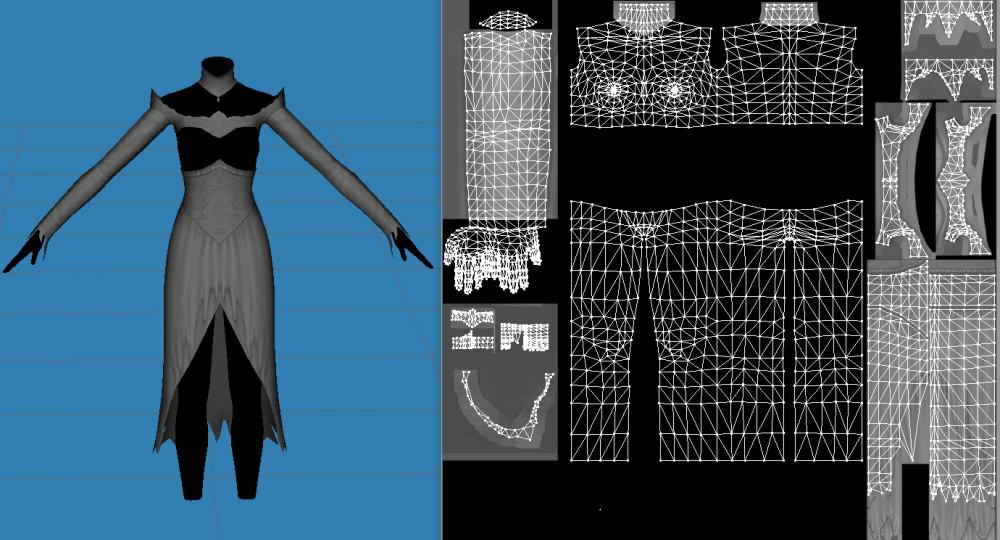
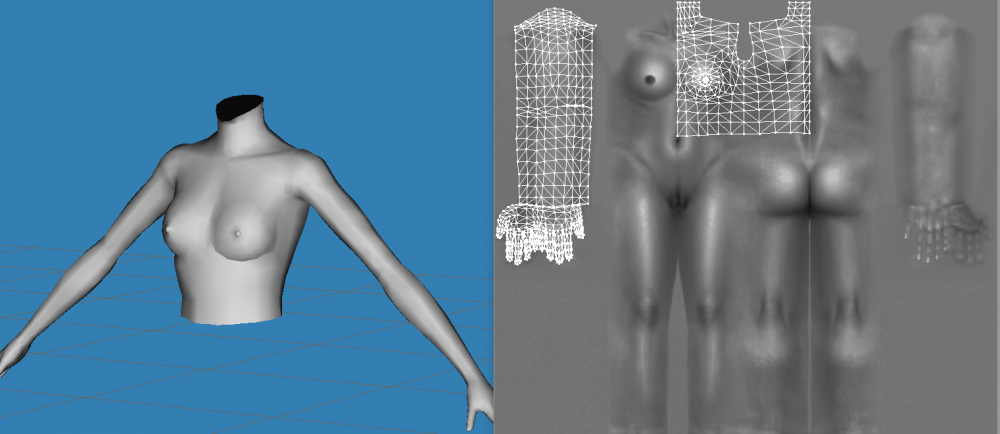
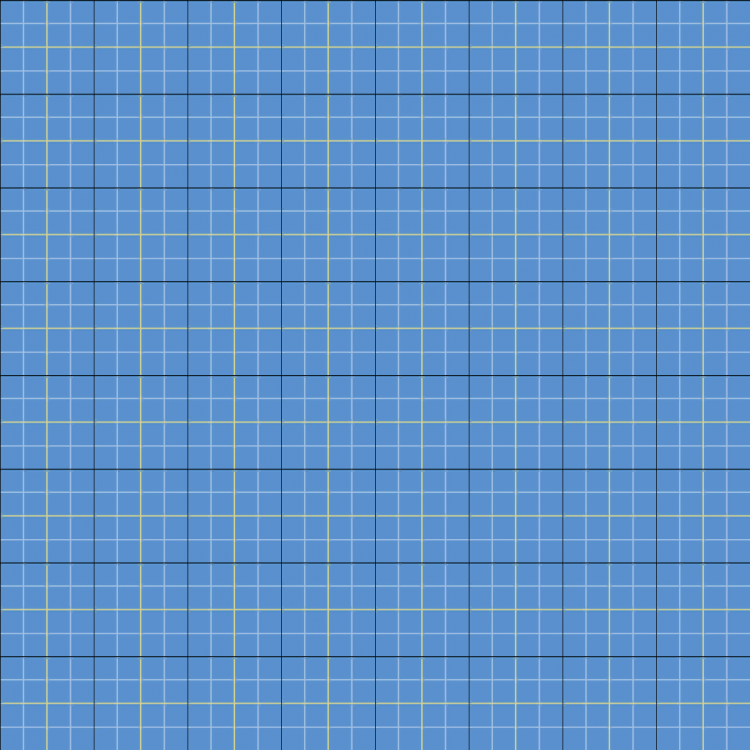
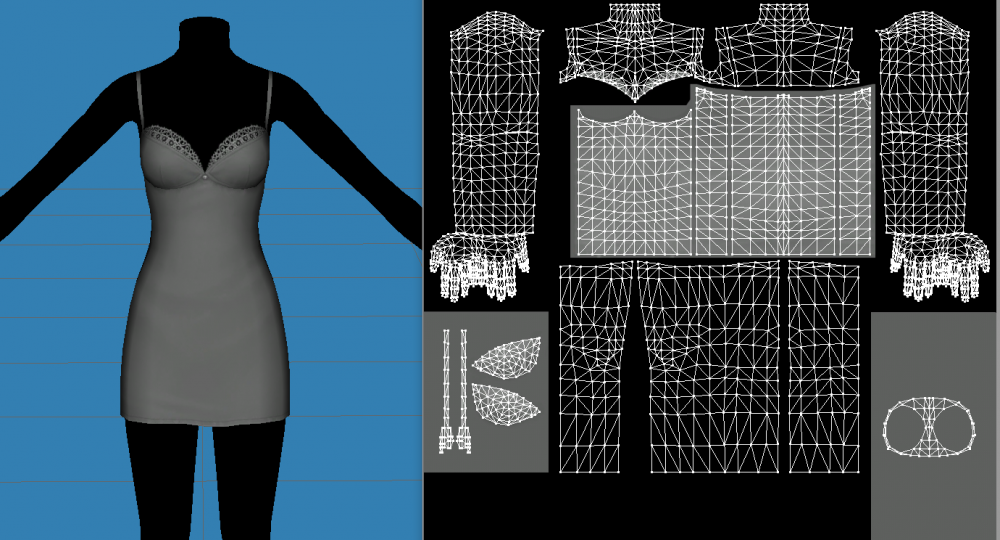
This isn't a detailed guide for that go to modthesims, thesimsresource, tumblr, youtube, etc. I'm just sharing whatever I've learned while making stuff. Part 1 (Tools) here Part 2 (How CC works) here Part 3 (Textures) here Part 4 (Meshing: General Info) here If I omitted something or need more help let me know. Part 4.2, Meshing: UV Maps As I wrote in part 4.1 your clothes will share the same texture space with the rest of the body, for accessories like stockings, underwear, etc it’s not an issue, the same for collars, earrings, glasses, hats and whatnot; also thousands of custom clothes had been made with this “limitation” for years, the tricky part comes when you want to make sexy stuff like corsets with the chest exposed or a revealing mini-skirt. The UV map is divided on tops, bottoms and feet; each has a space dedicated for the body and an extra space for whatever you’re doing. The fast approach would be to just use the extra space by resizing your custom textures to this fit this area, the problem is that some patterns won’t look right, at all; also your textures will be stretched to hell and back. Green: tops, blue: bottoms, red:feet (image is not “pixel perfect” but close enough) One alternative is to make more space so you can accommodate your textures with little or none scaling. You can start by deleting the body sections that are going to be hidden behind your clothes, in the case of a corset you delete the navel and part of the back but even then this might be not enough. What I do is to delete one of the arms and duplicate the opposite, then on the clone I apply a “mirror” modifier; now both arms will share the same texture space and that leaves us with an extra area we can use. This is how “Horror Mistress EDIT” works: I deleted the arm and cloned it and then deleted half of dress and cloned it too, thanks to this I just had to scale the textures 10% to fit without further modification On general this can cause some shading problems specially on EVERY seam, I fix most of them using the “Align Normals”, “Extended Manual Edit” or “Wes H’s Merge Tools” plug-ins on Milkshape. Also when two meshes share the same UV map it causes some weirdness on CAS, once you get in-game everything should look OK. The same technique can also be applied on legs, torso and feet just be aware that if you use a detailed custom skin these body parts will look “oddly symmetric” or just weird so don’t go overboard. Clothes, shoes an accessories can also suffer from this but it’s not as evident. This is a fully functional MedBod Top but if you look at the UV map you can see it only has one arm and half the torso, you can use the unused space for your clothes textures Even if you don’t use them is recommended to “align” your mesh to use patterns, this is one of TS3 biggest strengths (although poorly optimized) and gives you and whoever downloads your CC limitless customization (unlike TS4...). I ignore how it actually works but it seems the game duplicates a pattern, a 128x128 square, over your multiplier texture and according to the areas delimited by the mask texture. To more or less match that I made this image: The black lines represent the size of a base pattern: 128x128, and to further help I also included yellow lines at every 64 pixels and light blue at 32. Below you can see how I use it to align patterns for the CC I make: What happens if you have to scale down your UV, but want it to show patterns properly? In TSRW, in the section when you select the colors for the mask there’s a cell called “Tilling” followed by two values separated by a comma: “4,4”, if you change it to 6,6 or 8,8 you will “scale down” the pattern (The Impossible Heels use 8,8) at 10, 10 and at least in my game patterns look blurry so YMMV.
-
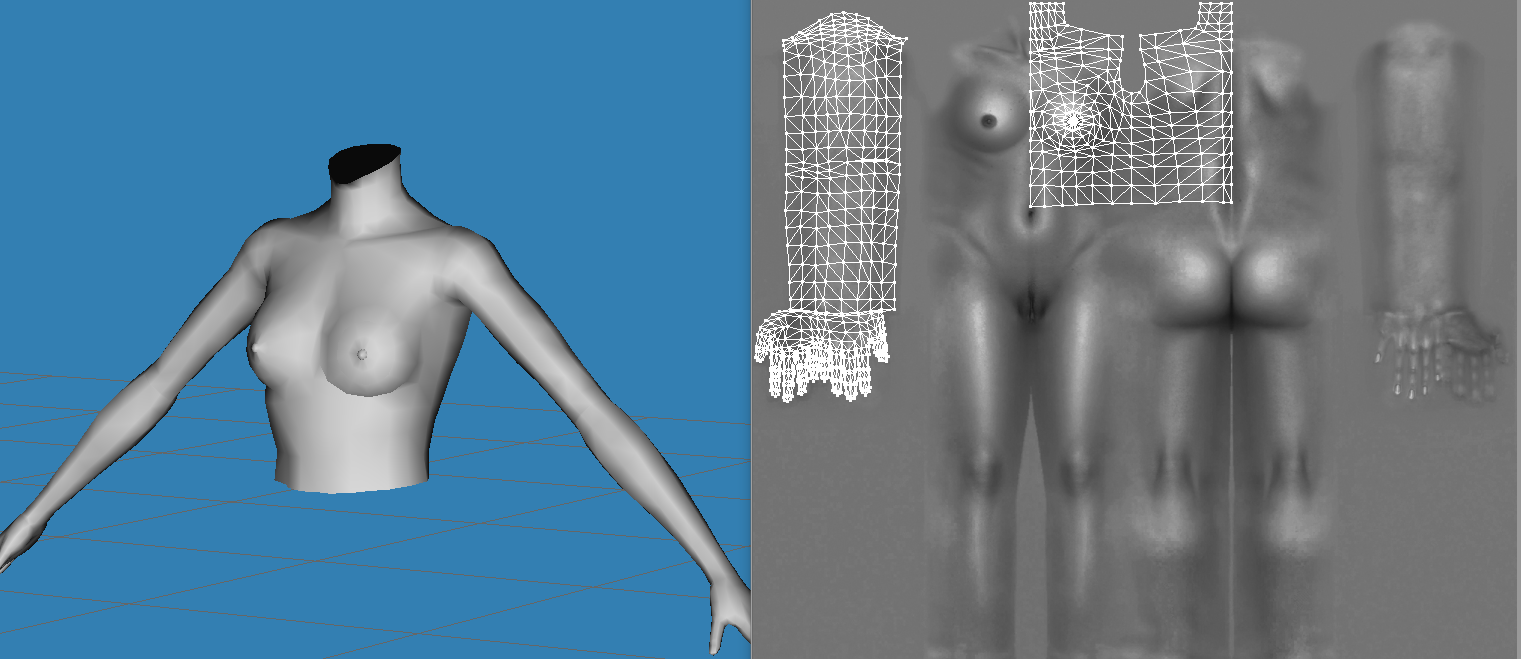
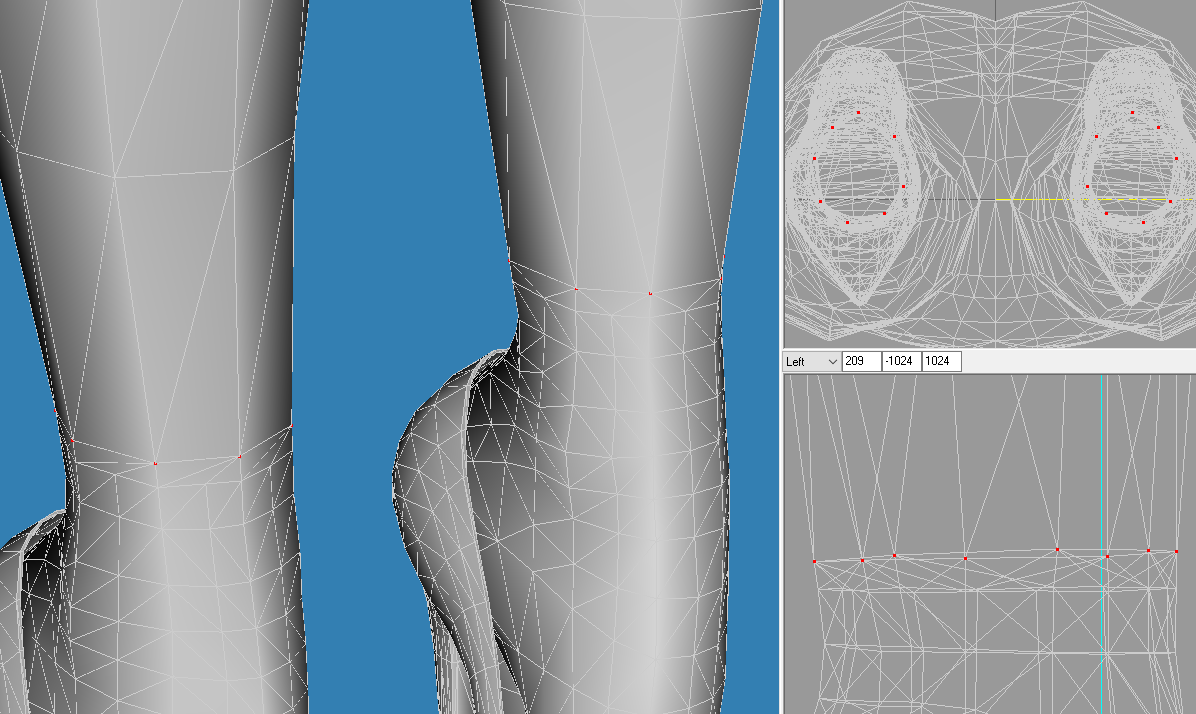
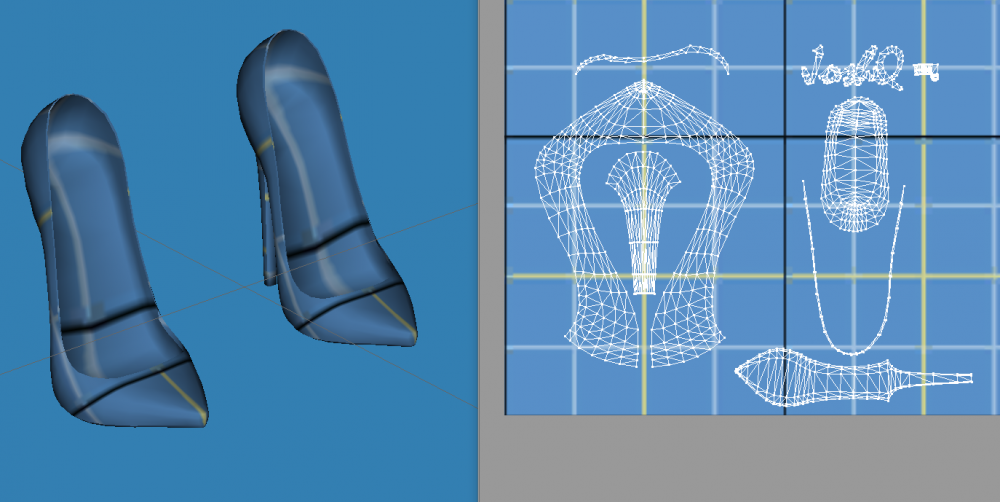
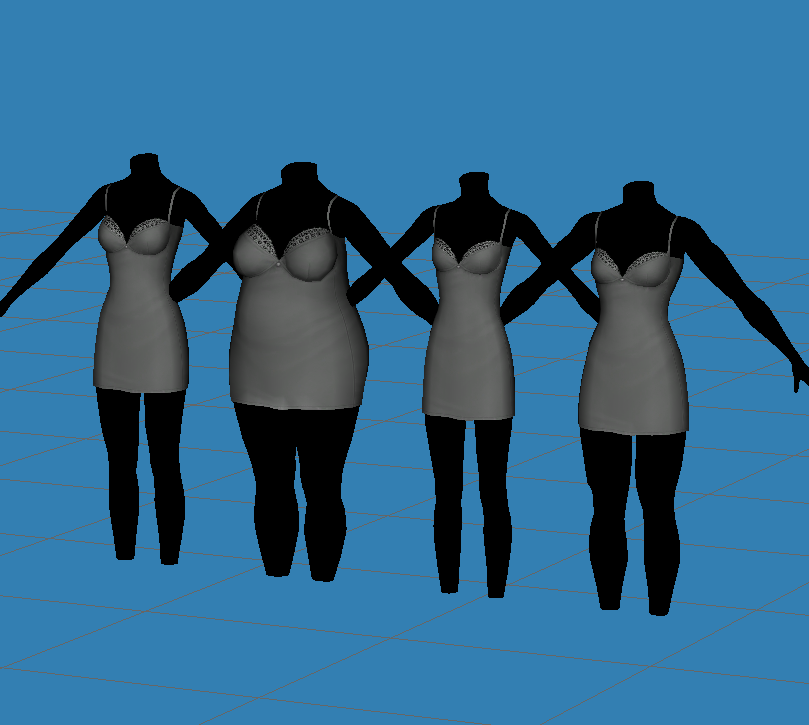
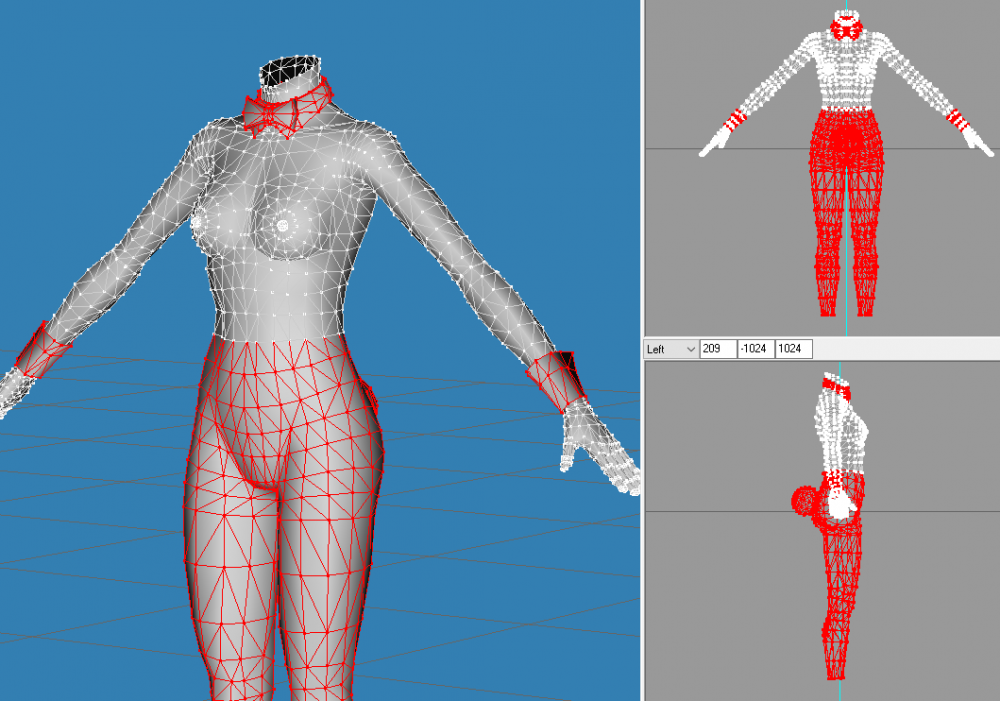
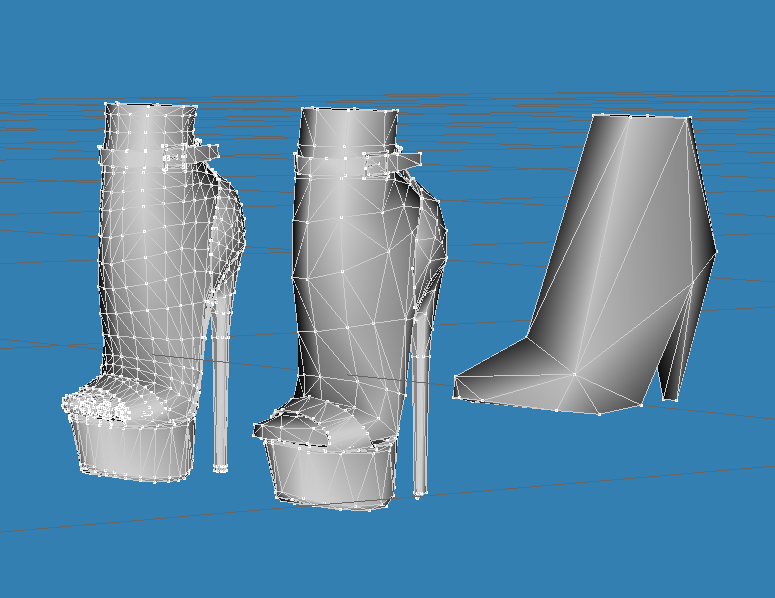
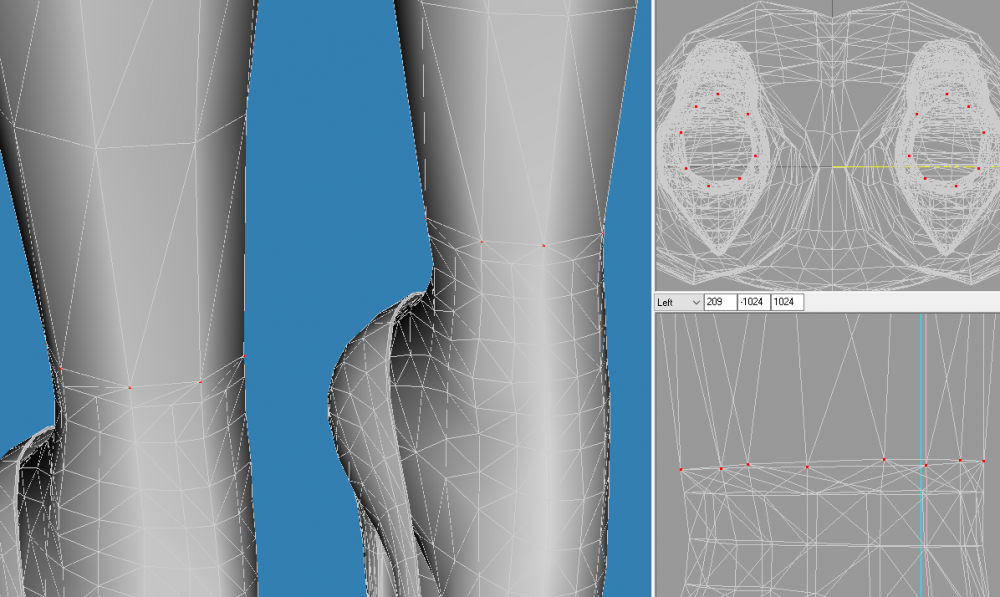
This isn't a detailed guide for that go to modthesims, thesimsresource, tumblr, youtube, etc. I'm just sharing whatever I've learned while making stuff. Part 1 (Tools) here Part 2 (How CC works) here Part 3 (Textures) here If I omitted something or need more help let me know. Part 4.1, Meshing: General info Because meshing involves lots of info I will proceed dividing the subject in several parts I’m counting you already read the previous parts or at least you are somewhat familiar with the modding tools. You can also start reading most of the tutorials located on modthesims. Inside the spoiler I included links to some of them plus informative posts: Clothes aren’t “standalone” it includes body parts like neck, hands, legs and more depending how revealing they are and to make things trickier both share the same texture space/UV map; the only exceptions are hair and 3D accessories like watches, necklaces, earrings, glasses and alike. Yes, you can make an accessory jacket or even a full dress BUT this game is known to blurry textures from accessories and even with the HD mod and/or 4k textures the results can look plain ugly. Left. AfBodyRomanticSlip’ Mesh; Right. Its UV map Also your mesh needs to be adapted to at least to 3 body shapes or “morphs” besides the “base” one: fat, thin and fit, the fifth one is optional and its meant for pregnant sims. The SAME MESH must be adapted for every morph or TSRW will throw an error. Cmar’s Mesh Toolkit and TSRW can autogenerate morphs if used with a reference mesh but the more complex your mesh is the more difficult will be for the tool to generate them correctly so most of the time you’ll need to make corrections manually afterwards. Morphs form AfBodyRomanticSlip, from left to right: group_base, group_fat, group_thin, group_fit Talking about weight, every vertex has a bone value/bone paint/bone assignment allotted that is used by animations and sliders, cherry on top? There’s a limit on the number of bones you can include in your clothes, anything above 60 will provoke weirdness no matter what, the easiest way to deal with it is to divide you mesh in at least “two groups” (check most “full body” clothes made by EA to see an example of this). Mesh Toolkit/TSRW can also help you with bones but the same limitation applies This is how Sexy Rabbit works: (highlighted in red) the neck, tail, cuff and legs are separated in one mesh group, leaving the whole upper torso in a second one The game uses two Levels Of Detail: LOD2 and LOD3, there’s some conflicting info around how the game uses them but it seems both are invoked depending on the camera distance and map view. As I said on the first part of this “guide” you only need to worry about LOD 2, for 3 you can “recycle” parts from the rest of the game. LODs aren’t linked meaning you don’t forcibly need to create LOD2/LOD3 for a piece of CC to show in the game, but it’s preferred to do so. Some 3D accessories (like glasses, earrings, rings and alike) don’t use morphs and some of them use a fourth LOD for better detail LODs used on Impheels Gala, from left to right: LOD1, LOD2, LOD3. Depending on your garment you will have to take care of seams on the neck, hip and ankles for every morph and LOD; this is the only part where you can’t deviate from the original sim-body design otherwise you will have visible and very nasty gaps on those areas or small but very annoying white dots. In short, every vertex located on the seams must coincide on the same place ALSO they need to share the same bone values or won’t synchronize during any kind of animations. Mesh Toolkit has a tool to fix seams but I can’t say if it works because I prefer to fix seams directly on Milkshape. Vertices on the top of the “Impossible Feet” coincide in position and bones value with those located on the legs I heard several times there’s also a limit on the number or polygons you can include on a mesh, it seems it’s around 10k BUT I had seen all type of custom garments surpassing this limit from 20k necklaces to 40k shoes or 70k blouses so honestly I don’t know. Obviously a “slim” mesh is going to be easier to manipulate and fix if necessary but also modern tools like maya, modo or marvelous designer can modify gigantic meshes without effort. If you ask me I prefer to be on the “safe side”, specially with clothes because clipping is a VERY BIG problem that can cause countless headaches... So in resume compared to other games The Sims 3 is not that complex to mod (if I did it so can you!) but the more ambitious you are the more you will be jumping through hoops to achieve it.
-
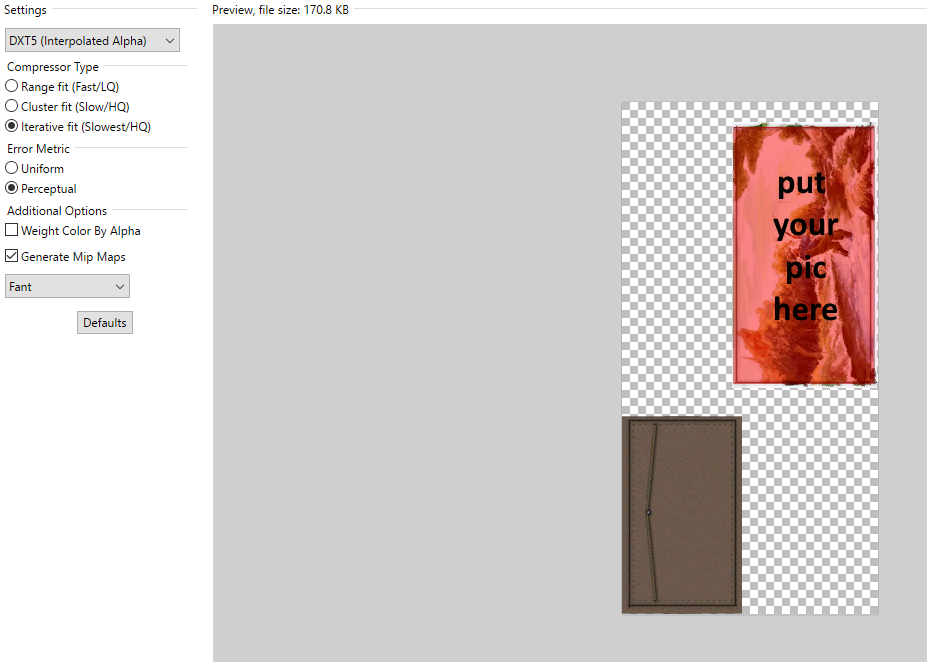
This isn't a detailed guide for that go to modthesims, thesimsresource, tumblr, youtube, etc. I'm just sharing whatever I've learned while making stuff. If I omitted something or need assistance let me know. Part 1 (Tools) here Part 2 (How CC works) here If I omitted something or need more help let me know. Part 3: Textures Here is a writeup about how DDS compress an image, the article is very old but so is this game so the info remains relevant. Recommended tutorial by Saliwa and these by TJ Streak: NaughtySims_Tutorial_forSims3.zip Also the SimsWiki has a nice collection. The easiest way to avoid your textures look like crap is to make them at 2048x2048 or 4096x4096 resolution mixed with the HQ mod, the downsize is the game will struggle to process them unless you have a monster CPU/GPU (and probably even then you will notice lag). What I do for stockings and lingerie is to generate the textures at 2048x2048 and then scale them back in photoshop or paint.net that reduces some hard edges and looks way better than generating textures at 1024 from the start. Here are the guides I use to make clothes, the UV map was generated in Blender using the default body and feet (is 99.62% compatible with MedBod/Impossible Feet and might be with other custom meshes). The full body mesh is used to test the textures and to find misalignments on seams or any other kind of problems, sadly most defects appear once you’re in-game... s3_fembody_guides.zip Another way to reduce contrast (read why in the Gamasutra article) and at least in the multiplier is to change the background of your clothing, like this: But wait, won’t that appear on the game? No because the alpha is what dictates what appears and don’t and is not affected by DDS compression (also check the base silky stockings as example): Using the alpha channel on your mask can also help to eliminate artifacts when you’re working with small details (check Stockings Set E2 as example). Remember you can activate/deactivate color channels in TSRW so you can combine them depending on your needs. After trying several programs Fireworks is still my favorite to create vectors that later can be exported as PNGs and then to DDS in Photoshop and similars; Inkscape comes in second place just because the interface can be tricky to learn and also because it has performance issues on Windows (less so in W10). Another tool that might become useful is Gravit Designer is free and you can download a standalone version, I need to do more testing but I’m liking it so far.

-
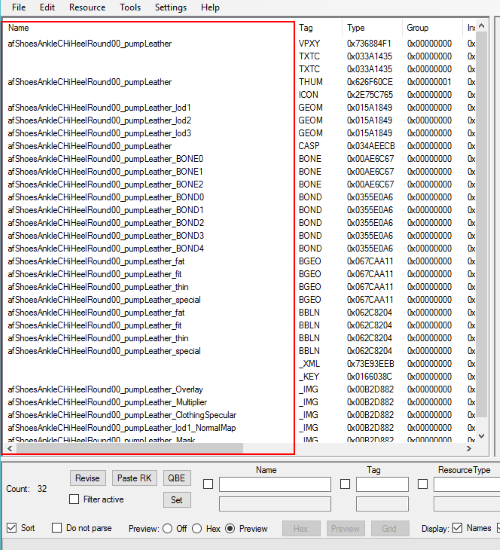
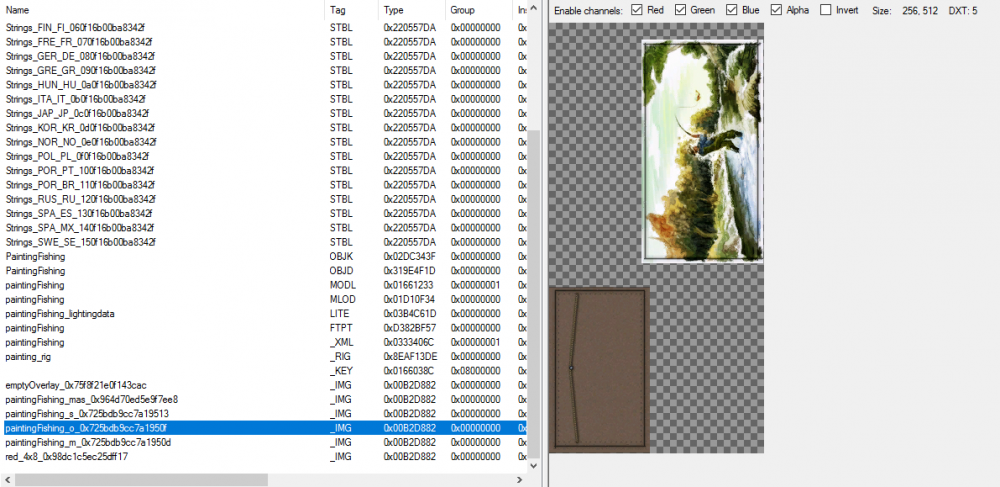
This isn't a detailed guide for that go to modthesims, thesimsresource, tumblr, youtube, etc. I'm just sharing whatever I've learned while making stuff. If I omitted something or need assistance let me know. Part 1 (Tools) here. Part 2: How CC works? First, what's the difference between a sims3pack and a package? Both are containers but the former supports encryption so EA use it to sell stuff, also sims3packs are installed via the launcher while a package can be copied or deleted directly from the "Mods" folder (just remember to clear your cache afterward). Back to how CC works: in short you clone a garment from the game and replace its textures and/or meshes, in the process you modify the internal hash so the game recognizes it as a complete new object or if you use the same hash the game replaces the original with yours. Tops, Bottoms, Shoes and Full Body clothes are composed of meshes and textures, accessories like stockings only use textures but some accessories also use a mesh. The best way to determine what clothes to clone is to open them in TSRW and check what they use, also you can export them to examine it closely. Can you make your own package from zero? If you're an expert maybe, otherwise cloning is easier and at least on TSR Workshop is straightforward the only thing you need to take care of is the name you input here: The more complex name you choose the less chances the hash it produces is going to conflict with someone else CC, so instead of selecting "My stuff123" as name you should always try to be descriptive. When you clone with s3oc the program will generate a hash using your computer's name or the one you select on the "Creators Name..." under the "Settings" menu (sadly some of those packages are incompatible with TSRW). The information below is not essential, is just for those who want to know a little more: Now lets open one of my CC with s3pe: The extensions located on the "Tag" column tell us what kind of files we are looking some are self-descriptive: CASP: this controls the categories for the CC and more, is tempting to try to experiment but it's best to leave it alone if you don't know what you're doing (talking from experience...) _IMG: the textures the CC use GEOM: this is the main mesh and its LODs BGEO: the mesh group for every body type: fat, thin, fit and special (aka pregnant) BOND: this file has coordinates for every bone available so you can controls its position according to the CC you're making, also best to left alone if you don't know what you're doing THUM: is the thumbnail you will see on CAS, normally is a 256x256 png pic. In its absence the game will generate its own ICON: is the thumbnail you will see on the launcher, TSRW automatically generates it I don't know what the rest does but in the time I've been doing clothes, accessories and body replacements I never had the need to modify them. One way to better distinguish each resource is using Cmar's Mesh Toolkit, go to "Package Tools" and then to "Name Those Files", select your package and then "Add Names" a window will appear with the name of the original item the CC was based on (in this case afShoesAnkleCHiHeelRound00_pumpLeather) just press "OK". Now you can overwrite the package or generate a new one, once open in s3pe the "Name" column will have a description: Packages generated by s3oc are already named. So using s3pe can you replace everything including meshes right away? Yes and No. Remember we're cloning a pre-existing piece of clothing that has its own characteristics on meshes and textures. Meshes alone need their own bones and morphs to work correctly and all the textures (overlay, mask, multiplier, specular and normalmap) need matching UV coordinates or hilarity will ensue. So unless you're an expert modder (and for reference I'm not even close to be one) is best to use s3pe for preview or extract meshes and textures and to make basic edits to CASP. EDIT: I made a mistake, indeed you can make CC with only s3pe mixed with s3oc and paint.net/gimp. You just need to select objects or clothing with very simple or "static" textures, like for example a painting. I cloned "Painting Fishing" in s3oc (select "include thumbnails") and exported this texture using s3pe (don't change the name): Using paint.net or gimp you can change the original paint to whatever you want: Once finished save it as DDS and overwrite the file: Then just drag it back to s3pe and press Enter. Because we used the same name as the original s3pe will replace it: You can do the same for the thumbnails or just allow the game to generate them (I prefer to make my own for easy finding), finally save your package and its ready to use. In Part 3 I will talk about textures and clothing in detail.


-
Because english is not my first language I cannot write a lengthy, step-by-step, super-detailed, fool-proof guide (I tried before and it was a fucking mess...). Fortunately there are dozens scattered all over the web, you can start on modthesims or thesimsresource also you can ask me if you need help. What I'm going to do is to share what I've learned while trying to mod TS3. Part 1: Tools (all software listed here was tested on Windows 7 and Windows 10 64) Patience: Unlike Bethesda's games there's zero official support/tools available for modders (beyond worlds and patterns creation), so almost every bit of knowledge is a product of hacking the game and most people involved already abandoned it so there's still a lot of unknowns. Also this is a DX9 game that still has TONS of bugs and bad programming everywhere and most of the tools hasn't seen an update in YEARS, so yeah... TSR Workshop: The main program I use to join together or extract meshes and textures you can also use it to clone objects/garments. Some creators recommend using older versions of the program but I haven’t had any problems with the latest YMMV Cmar’s Mesh Toolbox: If you don’t want to make morphs and bone assignments by hand this is what you need (albeit is not perfect) plus a bunch of other useful stuff like converting a WSO or GEOM to OBJ and back (download version 1.4.4.4 located in the second page, message #37) Milkshape 3D: I use it to modify EA’s meshes and UV Maps even if it's ancient by today standards it has enough tools to do the job EXCEPT when you need to create something from scratch Balancer Lite: Useful to create LOD2 meshes, you can also use it to make LOD3 but is so low-poly you can reuse any from the game and nobody will notice . Lite version only works with meshes below 10k Sims3pack Multi-extracter: I use it to convert sims3packs into packages Delphy’s Dashboard: I use it to test said packages Those are the basics but I also use: s3pe: it opens packages so you can see the contents and make some edits or replace almost everything inside s3oc: you can clone anything from the game with it, that also includes objects outside CAS and Build Mode that TSRW cannot reach SimGeomEditor: apparently it has many uses sadly I only know how to make transparent CC Metasequoia: After trying several programs I found Metasequoia to be the easiest and fastest for my needs (well, except when I need an UV mapper for that I use Blender) Adobe Photoshop: for basic editing you’re better using Paint.net but for more complex projects Photoshop has no equal (yet) don’t forget to download Nvidia or Intel’s DDS plug-in Adobe Fireworks: I use it to create custom vectors for accessory stockings, lingerie and everything in between you can also use Inkscape
-
Once again a question to the experts. How hard is it to create a companion? What programs are needed? It is only to test something, I want to learn to know the basics and I like to create new characters. Somewhere I had seen on YT how to do something like this, but I only understood the half of it, because the person was so fast. Stupid language barrier and so on ... Would it make sense as a beginner it to try? Thank you for your time.