JoshQ
-
Posts
838 -
Joined
-
Days Won
136
Content Type
Profiles
Articles
Events
Forums
Gallery
Downloads
Blogs
Everything posted by JoshQ
-
Besides some crashes (don’t forget to save frequently!) I’m liking Blender 2.9 so far although I still need to check add-on compatibility.
-
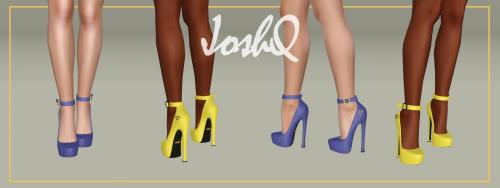
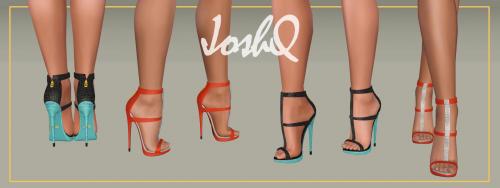
View File Impossible Heels ‘Kirara’ Details: Base game compatible For teen, young adult and adult femsims Enabled for everyday, sleepwear, formalwear, career, outerwear and validformaternity Disabled for random sims All LODs and morphs Polycount: LOD1=9718; LOD2=2086 4 color channels Will add 9 “units” to adult and young adult’s height, 8 to teens Only available as .package Defects: Shoes look “weird” on CAS, in-game looks fine Potential clipping with floor and furniture also misalignment on animations, poses and interactions between sims Pants might clip around the ankle Clipping and bending behind the ankle depending on custom animation (normal simming is OK) 3D accessories that contain morphs, like necklaces, might deform shoes and feet Notes: To add a little bit more detail I generated textures which include stuff like highlights and ambient occlusion, in short this looks 1234.56 times better than the “textures” I used before with just some microscopic artifacts here and there This is how I’m going to make my CC from now on, I’ll re-texture some of my previous releases although it’s going to be a very slow process because every mesh requires clean topology / uv map; some already have it but most will have to be remade… Compatible with the default body, MedBod and any other custom body mesh that follows the original leg seam Submitter JoshQ Submitted 08/25/2020 Category Shoes
-
505 downloads
Details: Base game compatible For teen, young adult and adult femsims Enabled for everyday, sleepwear, formalwear, career, outerwear and validformaternity Disabled for random sims All LODs and morphs Polycount: LOD1=9718; LOD2=2086 4 color channels Will add 9 “units” to adult and young adult’s height, 8 to teens Only available as .package Defects: Shoes look “weird” on CAS, in-game looks fine Potential clipping with floor and furniture also misalignment on animations, poses and interactions between sims Pants might clip around the ankle Clipping and bending behind the ankle depending on custom animation (normal simming is OK) 3D accessories that contain morphs, like necklaces, might deform shoes and feet Notes: To add a little bit more detail I generated textures which include stuff like highlights and ambient occlusion, in short this looks 1234.56 times better than the “textures” I used before with just some microscopic artifacts here and there This is how I’m going to make my CC from now on, I’ll re-texture some of my previous releases although it’s going to be a very slow process because every mesh requires clean topology / uv map; some already have it but most will have to be remade… Compatible with the default body, MedBod and any other custom body mesh that follows the original leg seam -
View File Accessory Heart Choker N01 This CC is completely free You’re allowed to modify it in any way, shape or form imaginable; you don’t need to ask me for permission I don’t take requests nor commissions Details: Base game compatible For teen, young adult and adult femsims Located on accessory section, necklaces slot Enabled for everyday, sleepwear, formalwear, swimwear, career, outerwear and validformaternity Disabled for random sims All LODs and morphs Polycount: LOD1=1432 ;LOD2=714 3 color channels Only available as .package Defects: The game “downgrades” textures and patterns from 3D accessories, normally happens when you use two or more (selection order might influence) Clipping on the base of the neck depending on animation, is mostly unnoticed under normal simming Accessories with morphs interfere and deform every.single.pair of Impossible Heels, instead I made ‘Fixed Size’ versions that separately adapts to the thin, medium and fat morph; you can install any combination without problems. Not the best solution but it works for my femsims Notes: To add a little bit more detail I generated textures which include stuff like highlights and ambient occlusion, in short this looks 1234.56 times better than the “textures” I used before Compatible with the default body, MedBod and any other custom body mesh that follows the original neck shape Submitter JoshQ Submitted 08/25/2020 Category Accessories
-
785 downloads
This CC is completely free You’re allowed to modify it in any way, shape or form imaginable; you don’t need to ask me for permission I don’t take requests nor commissions Details: Base game compatible For teen, young adult and adult femsims Located on accessory section, necklaces slot Enabled for everyday, sleepwear, formalwear, swimwear, career, outerwear and validformaternity Disabled for random sims All LODs and morphs Polycount: LOD1=1432 ;LOD2=714 3 color channels Only available as .package Defects: The game “downgrades” textures and patterns from 3D accessories, normally happens when you use two or more (selection order might influence) Clipping on the base of the neck depending on animation, is mostly unnoticed under normal simming Accessories with morphs interfere and deform every.single.pair of Impossible Heels, instead I made ‘Fixed Size’ versions that separately adapts to the thin, medium and fat morph; you can install any combination without problems. Not the best solution but it works for my femsims Notes: To add a little bit more detail I generated textures which include stuff like highlights and ambient occlusion, in short this looks 1234.56 times better than the “textures” I used before Compatible with the default body, MedBod and any other custom body mesh that follows the original neck shape -
Repost(?): some youtube channels with tutorials for Blender
- Josh Gambrell for hard surface modeling and tips to clean topology
- Cédric Lepiller for non-destructive modeling (even if he uses a paid addon of his own you can learn the fundamentals from him)
- CG Matter has a lot of different videos but I find the ones that shows how to use nodes, including a full course, very helpful
- Jayanam is one of the few that centers in making low-poly game assets which are the best to start learning, also develops free addons
- Bonus: This tutorial by CG Boost is still one of the best there is for newbies and covers almost all steps from modeling to rendering.
Of course there are hundreds if not thousands more, these are the ones that helped me the most. Also friendly reminder: you can use Cmar’s Meshtoolkit to convert an .obj to either .geom or .wso and back, you can also use Milkshape 3D (after installing some plugins) although it can be slow when exporting .objs.
-
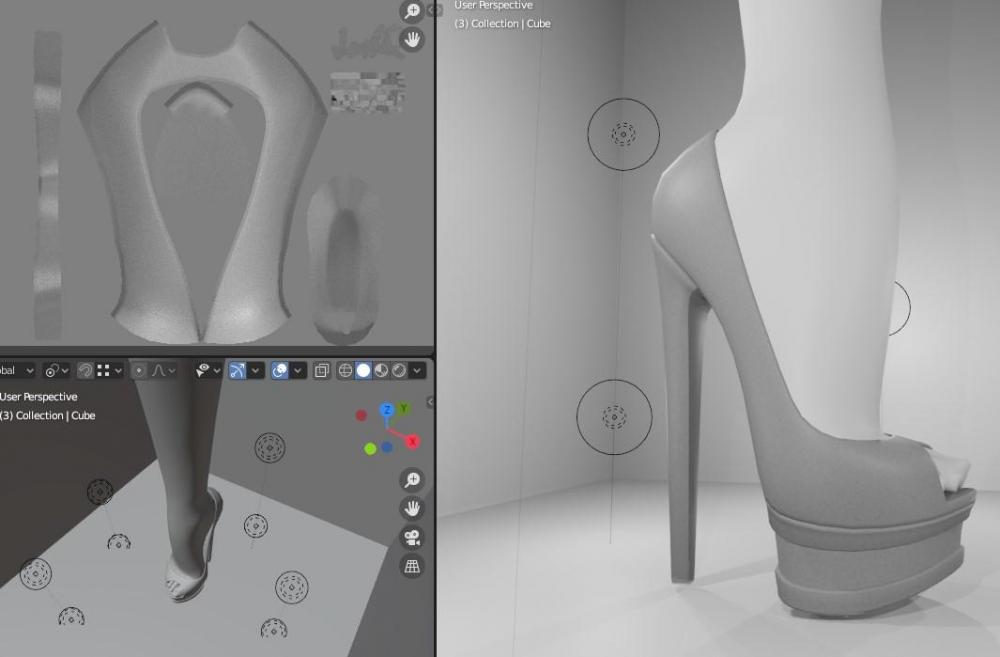
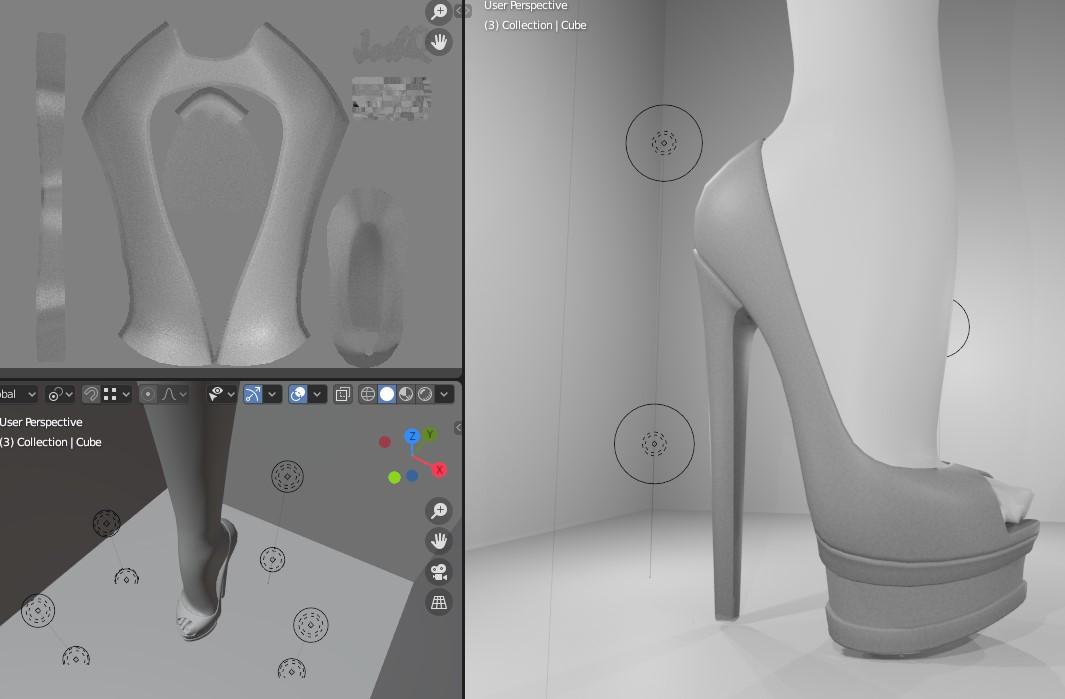
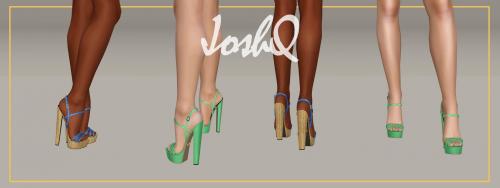
Despite the graininess (thanks to the minuscule area I’ve to work with) the difference between this and my old "textures" is discernible even at normal camera distance, at full zoom you will see some pixelation but by then you’re not playing anymore

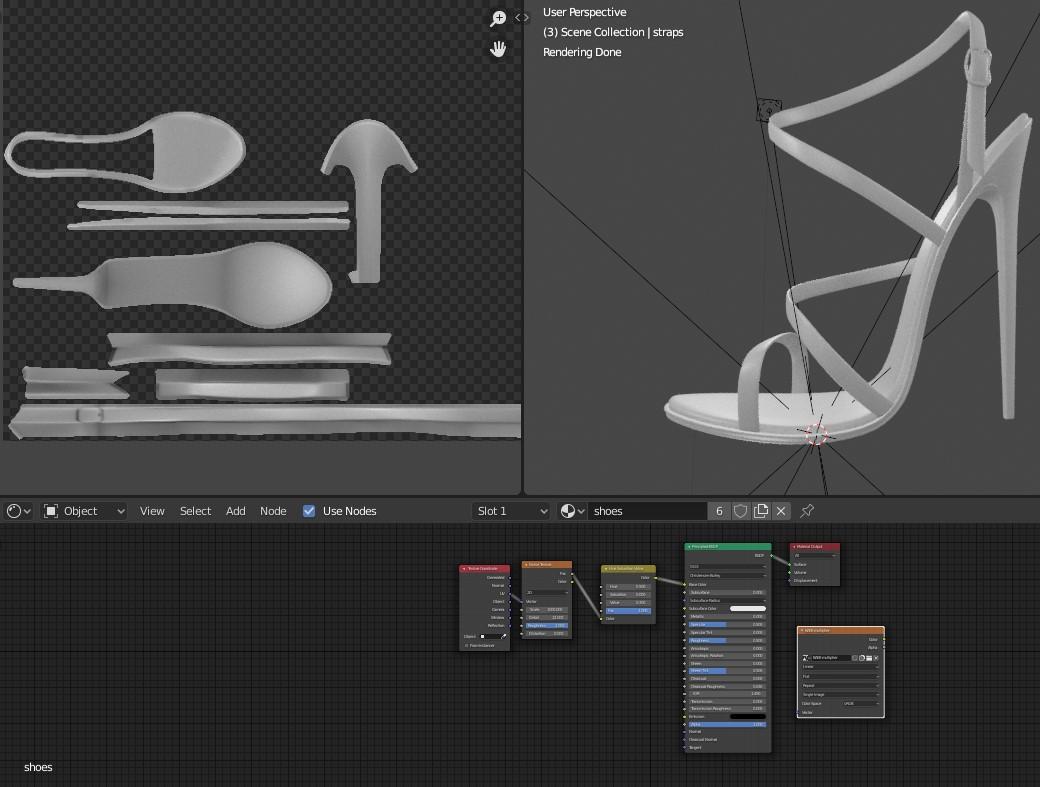
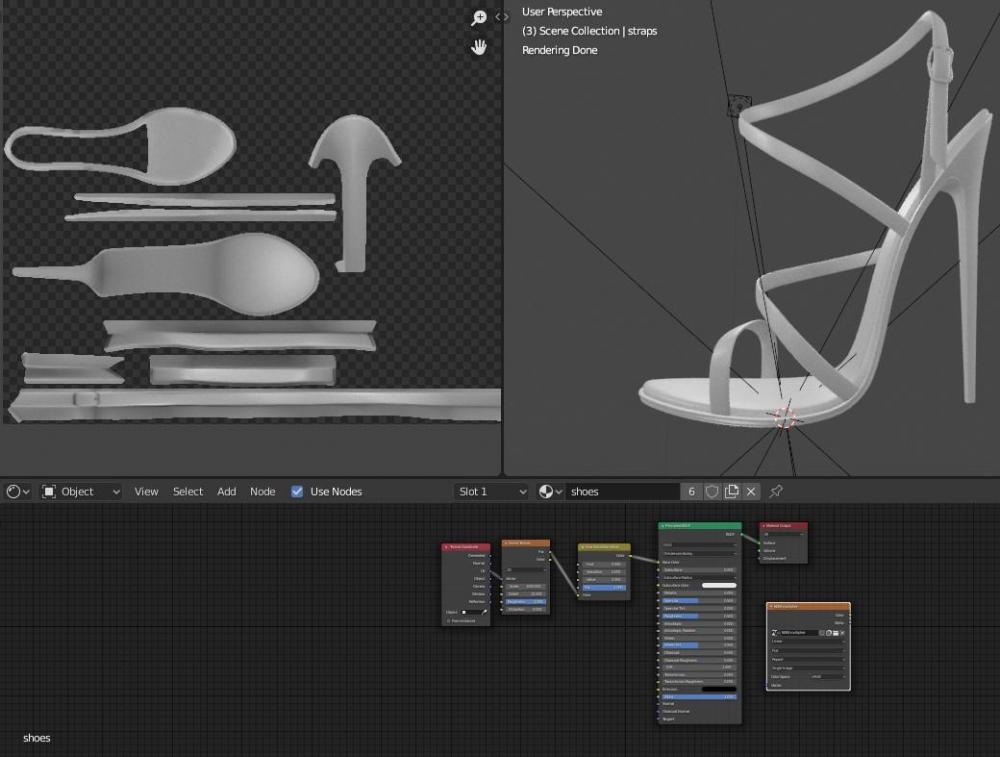
Will I ‘re-texture’ all my past releases? As I said before meshes require a clean UV map for the baking to give the best results, some models already have it but the majority would require some work. I will choose the “easiest” projects to retexture but of course I also have several other projects on queue (see pic) so yeah… it’s going to be a slow process moving forward.
Anyway, barring a worldwide disaster *nocks on wood* I’ll have something to share next week.
-
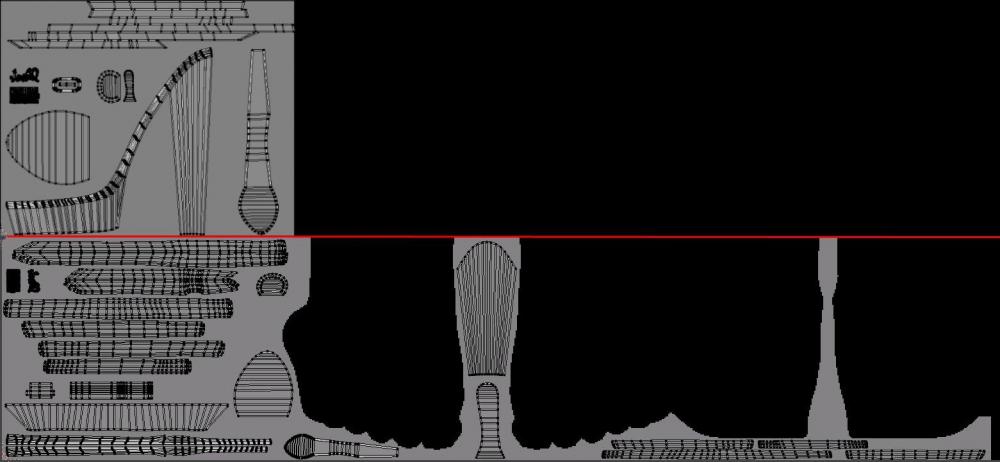
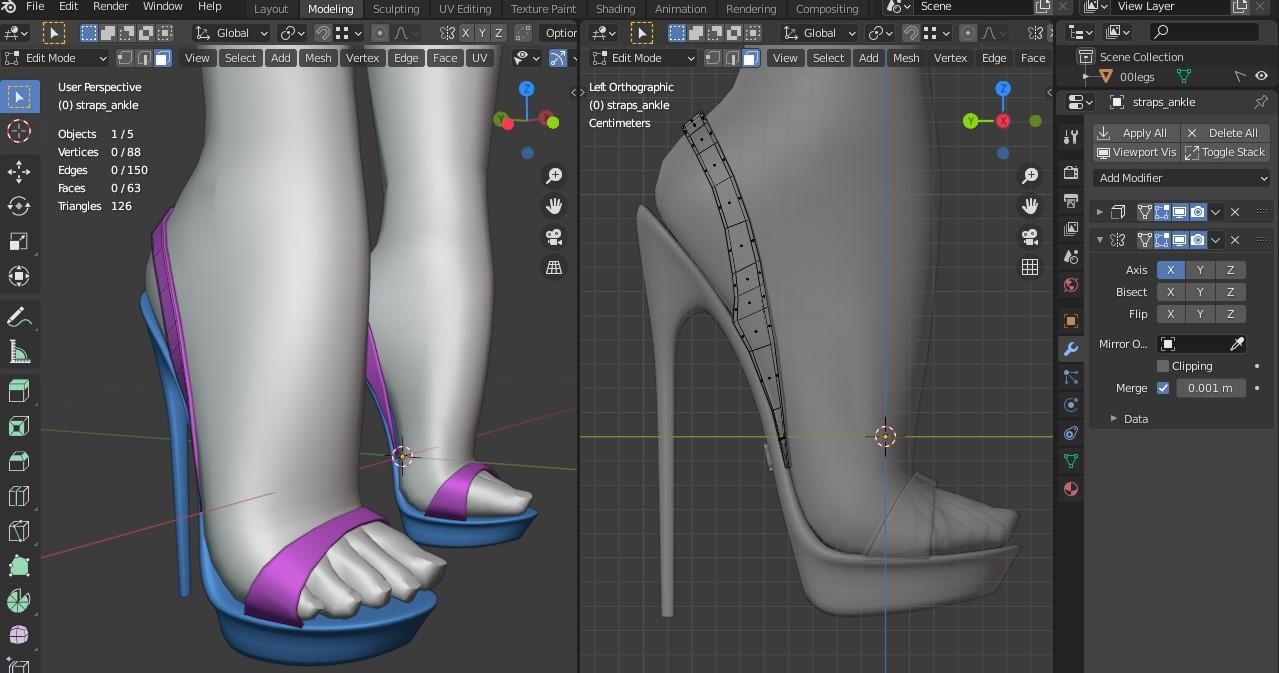
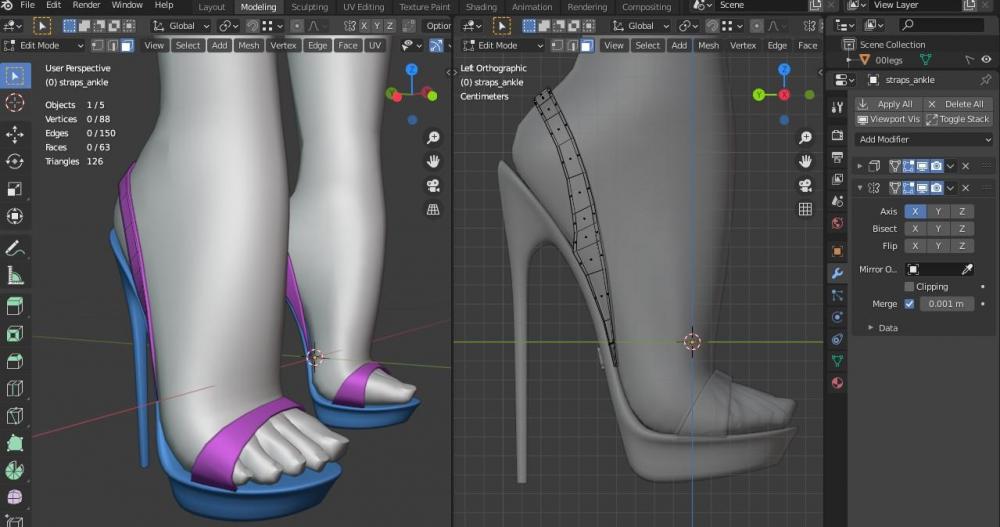
Above the red line: a simple uv map where exterior and interior faces share the same space, easy to make and it works with CAS patterns but isn’t suitable for baking in Blender.
Below: a more detailed map where every face is represented and, as you can see, takes a lot more space (and time to make). Both are from the same mesh and the latter is how I’m going to unwrap my UVs from now in the pursue of better textures.
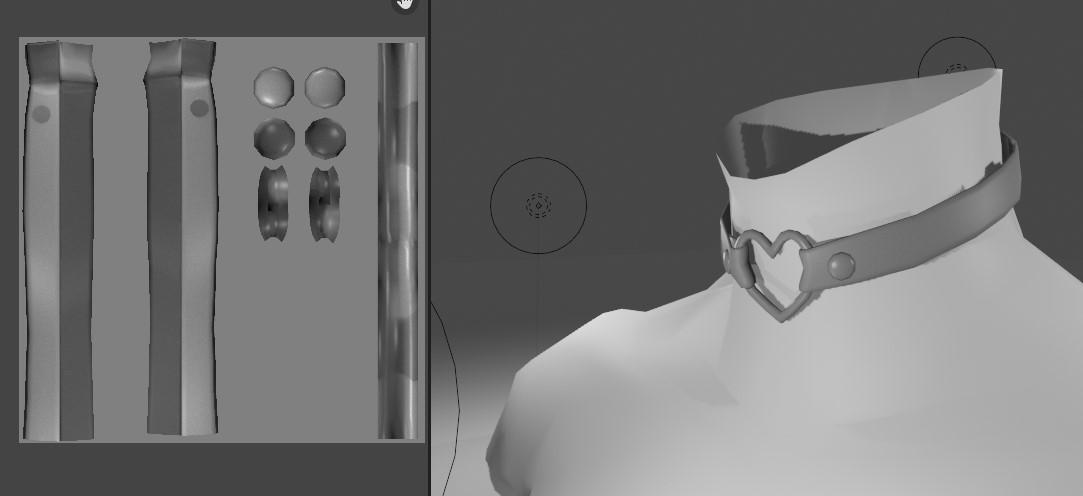
Another type of CC that benefits from this approach are 3D accessories (necklaces, belts, nails, etc). Now, this is “tricky” because as you might know the game’s engine reduces the texture quality the more accessories you put on your sim, but unlike shoes I can use the whole 1024x1024 area to counter it (more or less).
tl;dr: at the very least shoes and accessories are going to get a bump in detail from its textures, and because it takes more than double the time to make I’m back to 1-2 releases per month.
-
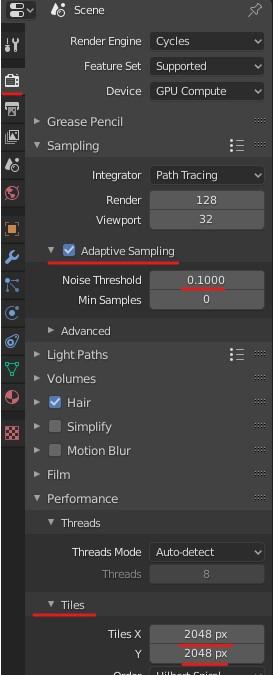
Quick tip to accelerate baking times in Blender 2.83 Go to ‘Tiles’ and change the value to the resolution you’re baking into, in my particular case 2048x2048 (if you want to go higher be sure your GPU has enough VRAM, mine has 2GB). Optional: activate ‘Adaptive sampling’ and change the threshold to ’0.1’ this will generate some faint noise, how visible or desirable this is will depend on your particular case. Using both options my times went from 2-3 minutes per bake to less than 1, it sounds insignificant but because I’m doing several tests at a time any reduction helps, of course better hardware might get quicker results. What about reducing rendering samples? In my tests I noticed a reduction in image quality so I’m leaving the samples alone.
- 37 replies
-
- 1
-

-
- general assistance
- questions
- (and 2 more)
-
Quick tip to accelerate baking times in Blender 2.83
Go to ‘Tiles’ and change the value to the resolution you’re baking into, in my particular case 2048x2048 (if you want to go higher be sure your GPU has enough VRAM, mine has 2GB).
Optional: activate ‘Adaptive sampling’ and change the threshold to ’0.1’ this will generate some faint noise, how visible or desirable this is will depend on your particular case.
Using both options my times went from 2-3 minutes per bake to less than 1, it sounds insignificant but because I’m doing several tests at a time any reduction helps, of course better hardware might get quicker results.
What about reducing rendering samples? In my tests I noticed a reduction in image quality so I’m leaving the samples alone.
-
One thing I admit my shoes are lacking is in the texture department, literally I use one shade of gray and even after increasing the polycount the way illumination works in The Sims 3 makes my CC look “flat”, or at least that’s how I perceive it (patterns help but not enough).
In the past I avoided generating textures for one main reason: The texture space for shoes is extremely small so details get lost or blurred at best and I don’t want to make 2k/4k textures to compensate nor make them by hand.
So I’ve been experimenting trying to find a way to add just the right amount of detail to textures without resulting in a pixelated mess, with some luck you’ll see the results in a month or two.
-
686 downloads
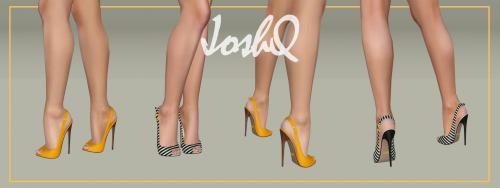
This CC is completely free You’re allowed to modify it in any way, shape or form imaginable; you don’t need to ask me for permission I don’t take requests nor commissions Details: Base game compatible For teen, young adult and adult femsims Enabled for everyday, sleepwear, formalwear, career, outerwear and validformaternity Disabled for random sims All LODs and morphs Polycount: LOD1=9444; LOD2=1796 4 color channels Will add 9 “units” to adult and young adult’s height, 8 to teens Only available as .package Defects: Shoes look “weird” on CAS, in-game looks fine Slight pattern distortion at the toes more noticeable when using geometric ones Potential clipping with floor and furniture also misalignment on animations, poses and interactions between sims Pants might clip around the ankle Clipping and bending behind the ankle depending on custom animation (normal simming is ok) 3D accessories that contain morphs, like necklaces, might deform shoes and feet Notes: Compatible with the default body, MedBod and any other custom body mesh that follows the original leg seam -
View File Impossible Heels ‘Caprice’ This CC is completely free You’re allowed to modify it in any way, shape or form imaginable; you don’t need to ask me for permission I don’t take requests nor commissions Details: Base game compatible For teen, young adult and adult femsims Enabled for everyday, sleepwear, formalwear, career, outerwear and validformaternity Disabled for random sims All LODs and morphs Polycount: LOD1=9444; LOD2=1796 4 color channels Will add 9 “units” to adult and young adult’s height, 8 to teens Only available as .package Defects: Shoes look “weird” on CAS, in-game looks fine Slight pattern distortion at the toes more noticeable when using geometric ones Potential clipping with floor and furniture also misalignment on animations, poses and interactions between sims Pants might clip around the ankle Clipping and bending behind the ankle depending on custom animation (normal simming is ok) 3D accessories that contain morphs, like necklaces, might deform shoes and feet Notes: Compatible with the default body, MedBod and any other custom body mesh that follows the original leg seam Submitter JoshQ Submitted 07/19/2020 Category Shoes
-
393 downloads
This CC is completely free You’re allowed to modify it in any way, shape or form imaginable; you don’t need to ask me for permission I don’t take requests nor commissions Details: Base game compatible For teen, young adult and adult femsims Enabled for everyday, sleepwear, formalwear, career, outerwear and validformaternity Disabled for random sims All LODs and morphs Polycount: LOD1=11550; LOD2=1836 4 color channels Will add 6 “units” to adult and young adult’s height, 5 to teens Only available as .package Defects: Shoes look “weird” on CAS, in-game looks fine Potential clipping with floor and furniture also misalignment on animations, poses and interactions between sims Pants might clip around the ankle Clipping and bending behind the ankle depending on custom animation (normal simming is ok) 3D accessories that contain morphs, like necklaces, might deform shoes and feet Notes: Everything was made from the ground up for a better shape, shading, and uv map. It almost doubled the polycount but it shouldn’t affect your game’s performance Compatible with the default body, MedBod and any other custom body mesh that follows the original leg seam -
View File Impossible Heels ‘Rhiannon Peeptoes’ This CC is completely free You’re allowed to modify it in any way, shape or form imaginable; you don’t need to ask me for permission I don’t take requests nor commissions Details: Base game compatible For teen, young adult and adult femsims Enabled for everyday, sleepwear, formalwear, career, outerwear and validformaternity Disabled for random sims All LODs and morphs Polycount: LOD1=11550; LOD2=1836 4 color channels Will add 6 “units” to adult and young adult’s height, 5 to teens Only available as .package Defects: Shoes look “weird” on CAS, in-game looks fine Potential clipping with floor and furniture also misalignment on animations, poses and interactions between sims Pants might clip around the ankle Clipping and bending behind the ankle depending on custom animation (normal simming is ok) 3D accessories that contain morphs, like necklaces, might deform shoes and feet Notes: Everything was made from the ground up for a better shape, shading, and uv map. It almost doubled the polycount but it shouldn’t affect your game’s performance Compatible with the default body, MedBod and any other custom body mesh that follows the original leg seam Submitter JoshQ Submitted 07/19/2020 Category Shoes
-
1,263 downloads
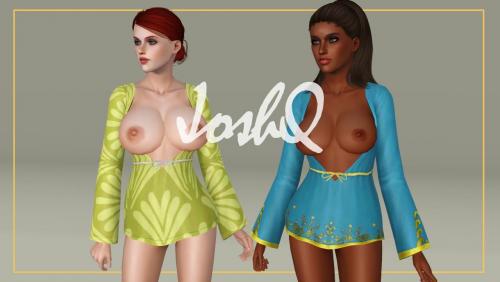
This CC is completely free You’re allowed to modify it in any way, shape or form imaginable; you don’t need to ask me for permission I don’t take requests nor commissions Details: Base game compatible For teen, young adult and adult femsims Located in ‘tops’ category Enabled for everyday, sleepwear, formalwear, career, outerwear Disabled for random sims All LODs and morphs Polycount: LOD1=4912; LOD2=2036 2 color channels 2 variations Only available as .package Defects: Torso and garment will look “weird” in CAS, in-game everything looks fine Texture stretching and pixelation depending how close you zoom, your sim weight and animations The original had a “texture cord” projected over the belly, I replaced it with a 3D one which might clip depending how much your sim bends over The end of the “skirt” will clip with the tights depending on the animation not a showstopper unless you look directly Notes: You can use EA’s naked bottoms and super skin-tight clothes (like yoga pants or bikini bottoms/panties) and one or two skirts, everything else will clip on the front including garments made for MedBod 1.9 Credits: Original mesh and textures by Electronic Arts -
View File Patio Cover Swim, MedBod EDIT This CC is completely free You’re allowed to modify it in any way, shape or form imaginable; you don’t need to ask me for permission I don’t take requests nor commissions Details: Base game compatible For teen, young adult and adult femsims Located in ‘tops’ category Enabled for everyday, sleepwear, formalwear, career, outerwear Disabled for random sims All LODs and morphs Polycount: LOD1=4912; LOD2=2036 2 color channels 2 variations Only available as .package Defects: Torso and garment will look “weird” in CAS, in-game everything looks fine Texture stretching and pixelation depending how close you zoom, your sim weight and animations The original had a “texture cord” projected over the belly, I replaced it with a 3D one which might clip depending how much your sim bends over The end of the “skirt” will clip with the tights depending on the animation not a showstopper unless you look directly Notes: You can use EA’s naked bottoms and super skin-tight clothes (like yoga pants or bikini bottoms/panties) and one or two skirts, everything else will clip on the front including garments made for MedBod 1.9 Credits: Original mesh and textures by Electronic Arts Submitter JoshQ Submitted 07/19/2020 Category Clothing
-
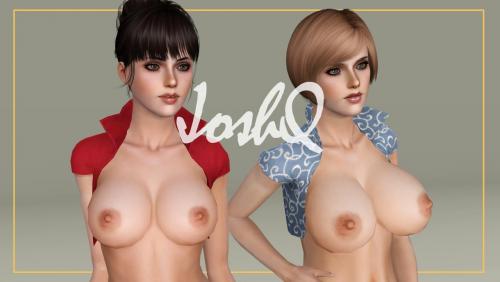
View File Jet Set Countessa, MedBod EDIT This CC is completely free You’re allowed to modify it in any way, shape or form imaginable; you don’t need to ask me for permission I don’t take requests nor commissions Details: Base game compatible For young adult and adult femsims Located in ‘tops’ category Enabled for everyday, sleepwear, formalwear, career, outerwear Disabled for random sims All LODs and morphs Polycount: LOD1=3524; LOD2=1841 1 color channel Only available as .package Defects: Torso and garment will look “weird” in CAS, in-game everything looks fine Texture stretching and pixelation depending how close you zoom, your sim weight and animations The bones the garment came with generated clipping with the face while using custom animations, I did some tweaking and stopped the clipping but in exchange the collar will move “oddly” Potential clipping with medium and long hair also with some 3D necklaces behind the neck Notes: Only compatible with bottoms made for MedBod 1.9 anything else will show an ugly gap on the hip Credits: Original mesh and textures by Electronic Arts Submitter JoshQ Submitted 07/19/2020 Category Clothing
-
2,437 downloads
This CC is completely free You’re allowed to modify it in any way, shape or form imaginable; you don’t need to ask me for permission I don’t take requests nor commissions Details: Base game compatible For young adult and adult femsims Located in ‘tops’ category Enabled for everyday, sleepwear, formalwear, career, outerwear Disabled for random sims All LODs and morphs Polycount: LOD1=3524; LOD2=1841 1 color channel Only available as .package Defects: Torso and garment will look “weird” in CAS, in-game everything looks fine Texture stretching and pixelation depending how close you zoom, your sim weight and animations The bones the garment came with generated clipping with the face while using custom animations, I did some tweaking and stopped the clipping but in exchange the collar will move “oddly” Potential clipping with medium and long hair also with some 3D necklaces behind the neck Notes: Only compatible with bottoms made for MedBod 1.9 anything else will show an ugly gap on the hip Credits: Original mesh and textures by Electronic Arts -
465 downloads
This CC is completely free You’re allowed to modify it in any way, shape or form imaginable; you don’t need to ask me for permission I don’t take requests nor commissions Details: Base game compatible For teen, young adult and adult femsims Enabled for everyday, sleepwear, formalwear, career, outerwear and validformaternity Disabled for random sims All LODs and morphs Polycount: LOD1=10058; LOD2=2336 4 color channels 2 variations (dark and clear insoles) Will add 7 “units” to adult and young adult’s height, 6 to teens Only available as .package Defects: Shoes look “weird” on CAS, in-game looks fine Patterns will look distorted on the top portion of the ankle Potential clipping with floor and furniture also misalignment on animations, poses and interactions between sims Pants might clip around the ankle Clipping and bending behind the ankle depending on custom animation (normal simming is ok) 3D accessories that contain morphs, like necklaces, might deform shoes and feet Notes: Compatible with the default body, MedBod and any other custom body mesh that follows the original leg seam Texture for the front strap borrowed from EP3SandalRhinestone -
View File Impossible Heels 'Saskia' This CC is completely free You’re allowed to modify it in any way, shape or form imaginable; you don’t need to ask me for permission I don’t take requests nor commissions Details: Base game compatible For teen, young adult and adult femsims Enabled for everyday, sleepwear, formalwear, career, outerwear and validformaternity Disabled for random sims All LODs and morphs Polycount: LOD1=10058; LOD2=2336 4 color channels 2 variations (dark and clear insoles) Will add 7 “units” to adult and young adult’s height, 6 to teens Only available as .package Defects: Shoes look “weird” on CAS, in-game looks fine Patterns will look distorted on the top portion of the ankle Potential clipping with floor and furniture also misalignment on animations, poses and interactions between sims Pants might clip around the ankle Clipping and bending behind the ankle depending on custom animation (normal simming is ok) 3D accessories that contain morphs, like necklaces, might deform shoes and feet Notes: Compatible with the default body, MedBod and any other custom body mesh that follows the original leg seam Texture for the front strap borrowed from EP3SandalRhinestone Submitter JoshQ Submitted 07/08/2020 Category Shoes
-
View File Impossible Heels ‘Agave’ This CC is completely free You’re allowed to modify it in any way, shape or form imaginable; you don’t need to ask me for permission I don’t take requests nor commissions Details: Base game compatible For teen, young adult and adult femsims Enabled for everyday, sleepwear, formalwear, career, outerwear and validformaternity Disabled for random sims All LODs and morphs Polycount: LOD1=7920 ;LOD2=1836 4 color channels Will add 7 “units” to adult and young adult’s height, 6 to teens Only available as .package Defects: Shoes look “weird” on CAS, in-game looks fine Potential clipping with floor and furniture also misalignment on animations, poses and interactions between sims Pants might clip around the ankle Clipping and bending behind the ankle depending on custom animation (normal simming is ok) 3D accessories that contain morphs, like necklaces, might deform shoes and feet Notes: Compatible with the default body, MedBod and any other custom body mesh that follows the original leg seam Submitter JoshQ Submitted 07/08/2020 Category Shoes
-
311 downloads
This CC is completely free You’re allowed to modify it in any way, shape or form imaginable; you don’t need to ask me for permission I don’t take requests nor commissions Details: Base game compatible For teen, young adult and adult femsims Enabled for everyday, sleepwear, formalwear, career, outerwear and validformaternity Disabled for random sims All LODs and morphs Polycount: LOD1=7920 ;LOD2=1836 4 color channels Will add 7 “units” to adult and young adult’s height, 6 to teens Only available as .package Defects: Shoes look “weird” on CAS, in-game looks fine Potential clipping with floor and furniture also misalignment on animations, poses and interactions between sims Pants might clip around the ankle Clipping and bending behind the ankle depending on custom animation (normal simming is ok) 3D accessories that contain morphs, like necklaces, might deform shoes and feet Notes: Compatible with the default body, MedBod and any other custom body mesh that follows the original leg seam -
View File Laced Corsets for MedBod This CC is completely free You’re allowed to modify it in any way, shape or form imaginable; you don’t need to ask me for permission I don’t take requests nor commissions Details: Base game compatible For young adult and adult femsims Located in ‘top’ category Enabled for everyday, sleepwear, formalwear, career, outerwear Disabled for random sims All LODs and morphs (sans pregnant) Polycount: version A LOD1=4344; LOD2=1854 / version B LOD1=4426 ; LOD2=2030 3 color channels Only available as .package Defects: Right arm looks weird in CAS, in-game looks fine Texture pixelation and stretching depending how close you look, body proportions and animation The laces will bend, clip and look weird depending how much your sim flexes her stomach. After several fixes I managed to eliminate the more evident defects so at normal camera distance everything should “look fine” Both versions will clip around the hip on overweight sims (and it shouldn’t…) Blockiness all around Notes: Compatible with bottoms made for MedBod 1.9 (as long as they don’t touch the garment), anything made by EA will show a gap on both front and rear Textures borrowed from Swimsuit Plunge and Body Chemise Credits: Original textures by Electronic Arts Submitter JoshQ Submitted 07/08/2020 Category Clothing