JoshQ
-
Posts
838 -
Joined
-
Days Won
136
Content Type
Profiles
Articles
Events
Forums
Gallery
Downloads
Blogs
Everything posted by JoshQ
-
View File Impossible Heels ‘Hera’ This CC is completely free You’re allowed to modify it in any way, shape or form imaginable; you don’t need to ask me for permission I don’t take requests nor commissions Details: Base game compatible For teen, young adult and adult femsims Enabled for everyday, sleepwear, formalwear, career, outerwear and validformaternity Disabled for random sims All LODs and morphs Polycount: LOD1=5176; LOD2=1404 4 color channels Will add 8 “units” to adult and young adult’s height, 7 to teens Only available as .package Defects: Shoes look “weird” on CAS, in-game looks fine Textures might look “grainy” at full zoom Extremely bright colors don’t look good Sadly the texture effect is “static” Potential clipping with floor and furniture also misalignment on animations, poses and interactions between sims Pants might clip around the ankle Clipping and bending behind the ankle depending on custom animation (normal simming is ok) 3D accessories that contain morphs, like necklaces, might deform shoes and feet Notes: Like Viper the texture uses two color channels otherwise the detail would be barely visible (use a slightly darker tone in the first and a slightly clear on the second) Compatible with the default body, MedBod and any other custom body mesh that follows the original leg seam Submitter JoshQ Submitted 10/20/2020 Category Shoes
-
382 downloads
This CC is completely free You’re allowed to modify it in any way, shape or form imaginable; you don’t need to ask me for permission I don’t take requests nor commissions Details: Base game compatible For teen, young adult and adult femsims Enabled for everyday, sleepwear, formalwear, career, outerwear and validformaternity Disabled for random sims All LODs and morphs Polycount: LOD1=5176; LOD2=1404 4 color channels Will add 8 “units” to adult and young adult’s height, 7 to teens Only available as .package Defects: Shoes look “weird” on CAS, in-game looks fine Textures might look “grainy” at full zoom Extremely bright colors don’t look good Sadly the texture effect is “static” Potential clipping with floor and furniture also misalignment on animations, poses and interactions between sims Pants might clip around the ankle Clipping and bending behind the ankle depending on custom animation (normal simming is ok) 3D accessories that contain morphs, like necklaces, might deform shoes and feet Notes: Like Viper the texture uses two color channels otherwise the detail would be barely visible (use a slightly darker tone in the first and a slightly clear on the second) Compatible with the default body, MedBod and any other custom body mesh that follows the original leg seam -
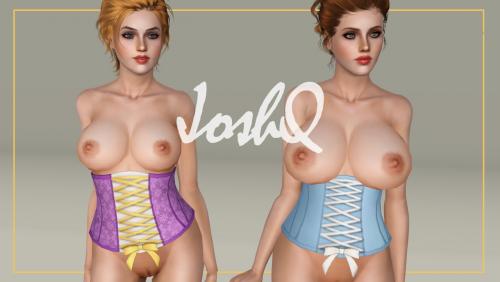
View File Simple Corset N04, for MedBod This CC is completely free You’re allowed to modify it in any way, shape or form imaginable; you don’t need to ask me for permission I don’t take requests nor commissions Details: Base game compatible For young adult and adult femsims Located in upper garment gategory Enabled for everyday, sleepwear, formalwear, career, outerwear Disabled for random sims All LODs and morphs Polycount: LOD1=4642; LOD2=2514 4 color channels Only available as .package Defects: Right arm looks weird on CAS, everything looks fine in-game Texture might look pixelated or “grainy” at full zoom Too dark / bright colors look awful Texture stretching and deformation depending on weight and animation Clipping might happen on animations, I tested several from the game and also custom and didn’t find a single case but I also don’t test every single one Notes: Compatible with MedBod 1.9’s bottoms and some skirts / pants made by EA (mostly from the base game). Everything else with volume around the hip will clip Instead of trying to fake shadows, highlights and other details in a 2D editor I allowed Blender to do the job for me using nodes. Sadly DDS compression and the 1024x1024 resolution washed half of it but it still looks semi-decent, if you avoid zooming into it Submitter JoshQ Submitted 10/20/2020 Category Clothing
-
755 downloads
This CC is completely free You’re allowed to modify it in any way, shape or form imaginable; you don’t need to ask me for permission I don’t take requests nor commissions Details: Base game compatible For young adult and adult femsims Located in upper garment gategory Enabled for everyday, sleepwear, formalwear, career, outerwear Disabled for random sims All LODs and morphs Polycount: LOD1=4642; LOD2=2514 4 color channels Only available as .package Defects: Right arm looks weird on CAS, everything looks fine in-game Texture might look pixelated or “grainy” at full zoom Too dark / bright colors look awful Texture stretching and deformation depending on weight and animation Clipping might happen on animations, I tested several from the game and also custom and didn’t find a single case but I also don’t test every single one Notes: Compatible with MedBod 1.9’s bottoms and some skirts / pants made by EA (mostly from the base game). Everything else with volume around the hip will clip Instead of trying to fake shadows, highlights and other details in a 2D editor I allowed Blender to do the job for me using nodes. Sadly DDS compression and the 1024x1024 resolution washed half of it but it still looks semi-decent, if you avoid zooming into it -
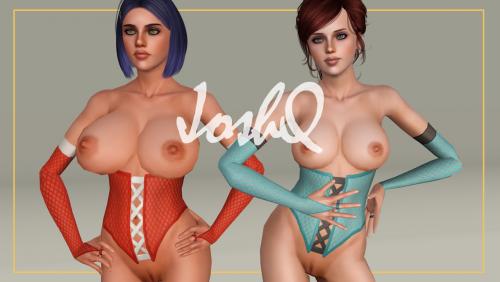
View File Simple Lingerie N15 This CC is completely free You’re allowed to modify it in any way, shape or form imaginable; you don’t need to ask me for permission I don’t take requests nor commissions Details: Base game compatible Located in accessory category, gloves slot For teen, young adult and adult femsims Enabled for everyday, sleepwear, formalwear, career, outerwear and validformaternity Disabled for random sims 3 color channels Only available as .package Defects: Texture might look pixelated at full zoom Texture stretching and deformation depending on weight and animation Saturated and/or dark colors look awful Notes: Instead of trying to fake shadows, highlights and other details in a 2D editor I allowed Blender to do the job for me using nodes. Sadly DDS compression and the 1024x1024 resolution washed half of it but it still looks way better than my past attempts Compatible with the default body, MedBod and any other custom body mesh that follows the original uv map Submitter JoshQ Submitted 10/20/2020 Category Accessories
-
967 downloads
This CC is completely free You’re allowed to modify it in any way, shape or form imaginable; you don’t need to ask me for permission I don’t take requests nor commissions Details: Base game compatible Located in accessory category, gloves slot For teen, young adult and adult femsims Enabled for everyday, sleepwear, formalwear, career, outerwear and validformaternity Disabled for random sims 3 color channels Only available as .package Defects: Texture might look pixelated at full zoom Texture stretching and deformation depending on weight and animation Saturated and/or dark colors look awful Notes: Instead of trying to fake shadows, highlights and other details in a 2D editor I allowed Blender to do the job for me using nodes. Sadly DDS compression and the 1024x1024 resolution washed half of it but it still looks way better than my past attempts Compatible with the default body, MedBod and any other custom body mesh that follows the original uv map -
Many moons ago I mentioned ‘Bforartists’ a fork of Blender that centers in ease of use. When I found it Blender 2.79 was the latest version which I barely was able to use so Bforartist looked like a good alternative, but then I looked into the developer notes and goals for Blender 2.8 (which I believe was in early alpha back then) and decided to wait for it instead.
Recently I checked it once more and now the project has up to date builds based in Blender’s latest (2.91 alpha) and a more robust faq/guide section. If you hate memorizing keyboard shortcuts you might feel at home with Bfoarists because every function has a colorful icon and/or entry on the menu and you can still configure the workspace, install addons, etc.

I’m already accustomed to Blender’s new interface and shortcuts but if you’re the complete opposite maybe give Bforartists a try.
-
From this:
To this:
“Simple Lingerie” accessories (and maybe stockings) are going to become a little less simple... and that's a good thing!
-
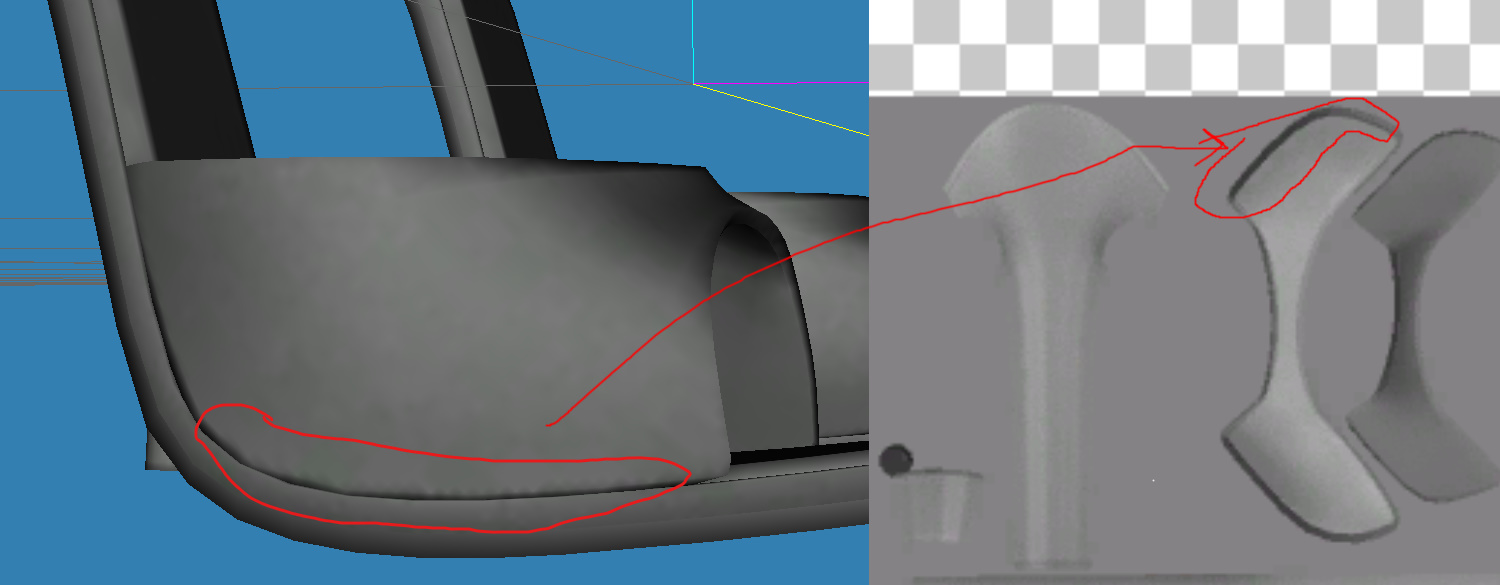
Quick and dirty trick to reduce contrast on textures for Sims 3
Why reduce contrast? Because DDS compression (DXT1 – DXT3 – DXT5) absolutely sucks when compressing pixels that go from near black / white to neutral gray:

It might look like no big deal on a 3D editor but once in the game these artifacts and other DDS-attributed defects (like ringing) can be easy to detect.
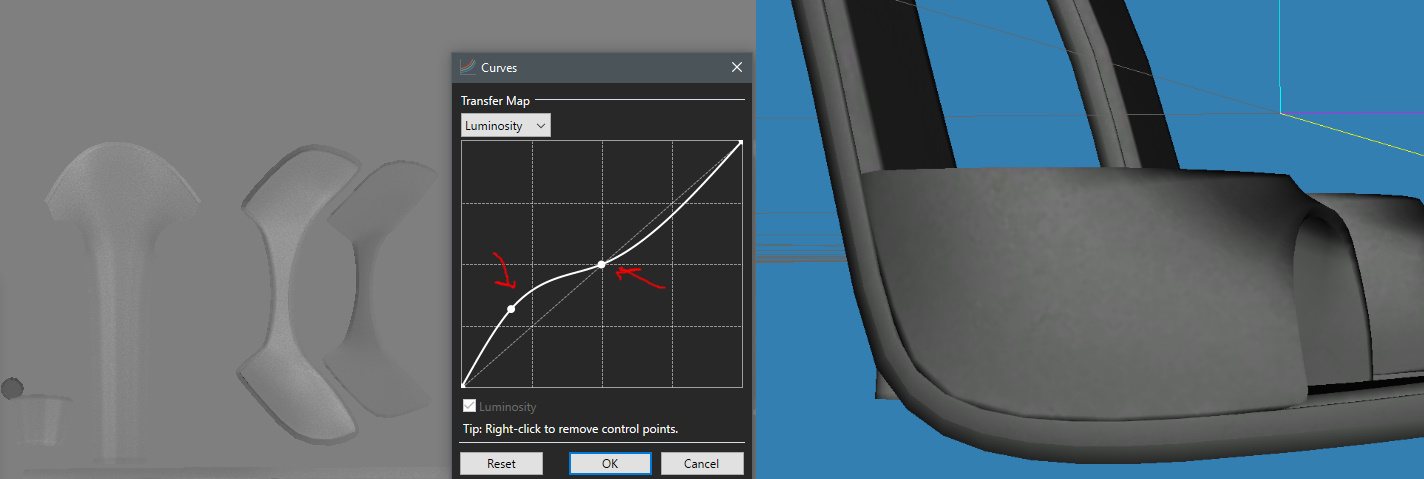
So besides modifying the lighting, material, UV size and baking settings inside Blender you can easily just use an image editor that allows modifying levels using curves (in my case PaintNet). Just be careful because, as you can see below, reducing contrast also washes away detail, a small adjustment is enough:

-
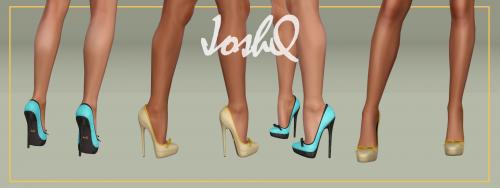
View File Impossible Heels ‘Freesia’ This CC is completely free You’re allowed to modify it in any way, shape or form imaginable; you don’t need to ask me for permission I don’t take requests nor commissions Details: Base game compatible For teen, young adult and adult femsims Enabled for everyday, sleepwear, formalwear, career, outerwear and validformaternity Disabled for random sims All LODs and morphs Polycount: LOD1=9828; LOD2=1796 4 color channels Will add 9 “units” to adult and young adult’s height, 8 to teens Only available as .package Defects: Shoes look “weird” on CAS, in-game looks fine Texture might look grainy at full zoom Too dark/bright colors look awful Potential clipping with floor and furniture also misalignment on animations, poses and interactions between sims Pants might clip around the ankle Clipping and bending behind the ankle depending on custom animation (normal simming is ok) 3D accessories that contain morphs, like necklaces, might deform shoes and feet Notes: Compatible with the default body, MedBod and any other custom body mesh that follows the original leg seam Submitter JoshQ Submitted 10/07/2020 Category Shoes
-
357 downloads
This CC is completely free You’re allowed to modify it in any way, shape or form imaginable; you don’t need to ask me for permission I don’t take requests nor commissions Details: Base game compatible For teen, young adult and adult femsims Enabled for everyday, sleepwear, formalwear, career, outerwear and validformaternity Disabled for random sims All LODs and morphs Polycount: LOD1=9828; LOD2=1796 4 color channels Will add 9 “units” to adult and young adult’s height, 8 to teens Only available as .package Defects: Shoes look “weird” on CAS, in-game looks fine Texture might look grainy at full zoom Too dark/bright colors look awful Potential clipping with floor and furniture also misalignment on animations, poses and interactions between sims Pants might clip around the ankle Clipping and bending behind the ankle depending on custom animation (normal simming is ok) 3D accessories that contain morphs, like necklaces, might deform shoes and feet Notes: Compatible with the default body, MedBod and any other custom body mesh that follows the original leg seam -
View File Impossible Heels ‘Giraldii’ This CC is completely free You’re allowed to modify it in any way, shape or form imaginable; you don’t need to ask me for permission I don’t take requests nor commissions Details: Base game compatible For teen, young adult and adult femsims Enabled for everyday, sleepwear, formalwear, career, outerwear and validformaternity Disabled for random sims All LODs and morphs Polycount: LOD1=7882;LOD2=2336 4 color channels Will add 8 “units” to adult and young adult’s height, 7 to teens Only available as .package Defects: Shoes look “weird” on CAS, in-game looks fine Texture might look grainy at full zoom Too dark/bright colors look awful Potential clipping with floor and furniture also misalignment on animations, poses and interactions between sims Pants might clip around the ankle Clipping and bending behind the ankle depending on custom animation (normal simming is ok) 3D accessories that contain morphs, like necklaces, might deform shoes and feet Notes: As you can see this “remake” has both a new mesh and improved textures, this is going to happen to some old models but the process is going to be very slow These won’t interfere with the original in case you want to use or compare both on your game Compatible with the default body, MedBod and any other custom body mesh that follows the original leg seam Submitter JoshQ Submitted 10/07/2020 Category Shoes
-

324 downloads
This CC is completely free You’re allowed to modify it in any way, shape or form imaginable; you don’t need to ask me for permission I don’t take requests nor commissions Details: Base game compatible For teen, young adult and adult femsims Enabled for everyday, sleepwear, formalwear, career, outerwear and validformaternity Disabled for random sims All LODs and morphs Polycount: LOD1=7882;LOD2=2336 4 color channels Will add 8 “units” to adult and young adult’s height, 7 to teens Only available as .package Defects: Shoes look “weird” on CAS, in-game looks fine Texture might look grainy at full zoom Too dark/bright colors look awful Potential clipping with floor and furniture also misalignment on animations, poses and interactions between sims Pants might clip around the ankle Clipping and bending behind the ankle depending on custom animation (normal simming is ok) 3D accessories that contain morphs, like necklaces, might deform shoes and feet Notes: As you can see this “remake” has both a new mesh and improved textures, this is going to happen to some old models but the process is going to be very slow These won’t interfere with the original in case you want to use or compare both on your game Compatible with the default body, MedBod and any other custom body mesh that follows the original leg seam -
I was looking into making some procedural textures using nodes, but every tutorial ends in a monstrosity like this one (and the image just shows half of it):
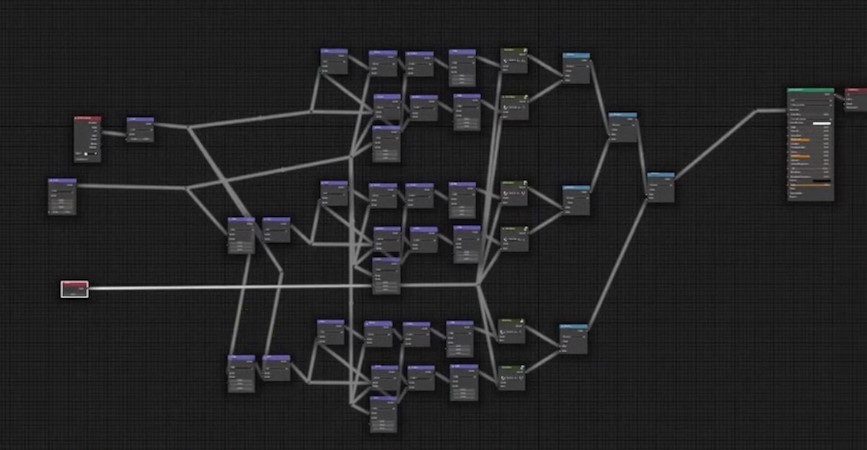
Which isn’t necessarily a bad thing because of the power of making something completely modifiable to the smallest detail. But then I remembered “Blender can also use DIY patterns” and then made this in less than 5 minutes:

Obviously is doesn’t generate as much detail as a procedural texture, but for the stuff I make you’ll hardly notice any difference.
TL;DR: sometimes being lazy does pay
-
NEWS: Microsoft bought Bethesda/Zenimax for 7.5 Billion USD
JoshQ replied to zilvradrow's topic in Gaming Discussions
A match made in half-assed heaven… -
Friendly reminders:
- Every single piece of CC made under my name is free, forever. Avoid scams
- I only “exist” in two places: Loverslab and NSFWmods. No twitter, no facebook, no discord, no tumblr, etc
- No rules, no tou, no nonsense. Like my stuff? Download it. Want to modify it or even port it to other engine? Don’t even ask me, do whatever you want
-

That is what makes you so awesome!
One of the reason I click Like to every mod and tutorial/guide support you submit on either site. NSFWmods is lucky to have such a person as you on our site. I am confident that the admin and other moderators will agree.
Keep up the great work and stay true to yourself.
-
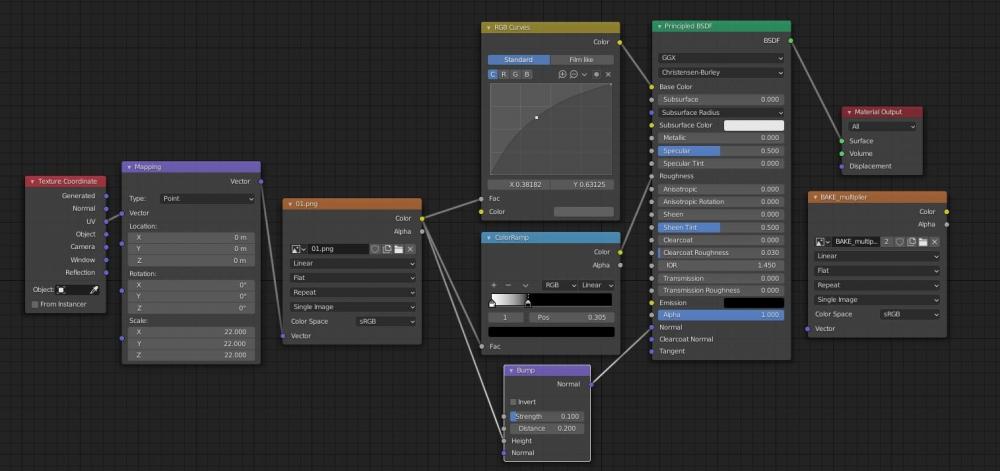
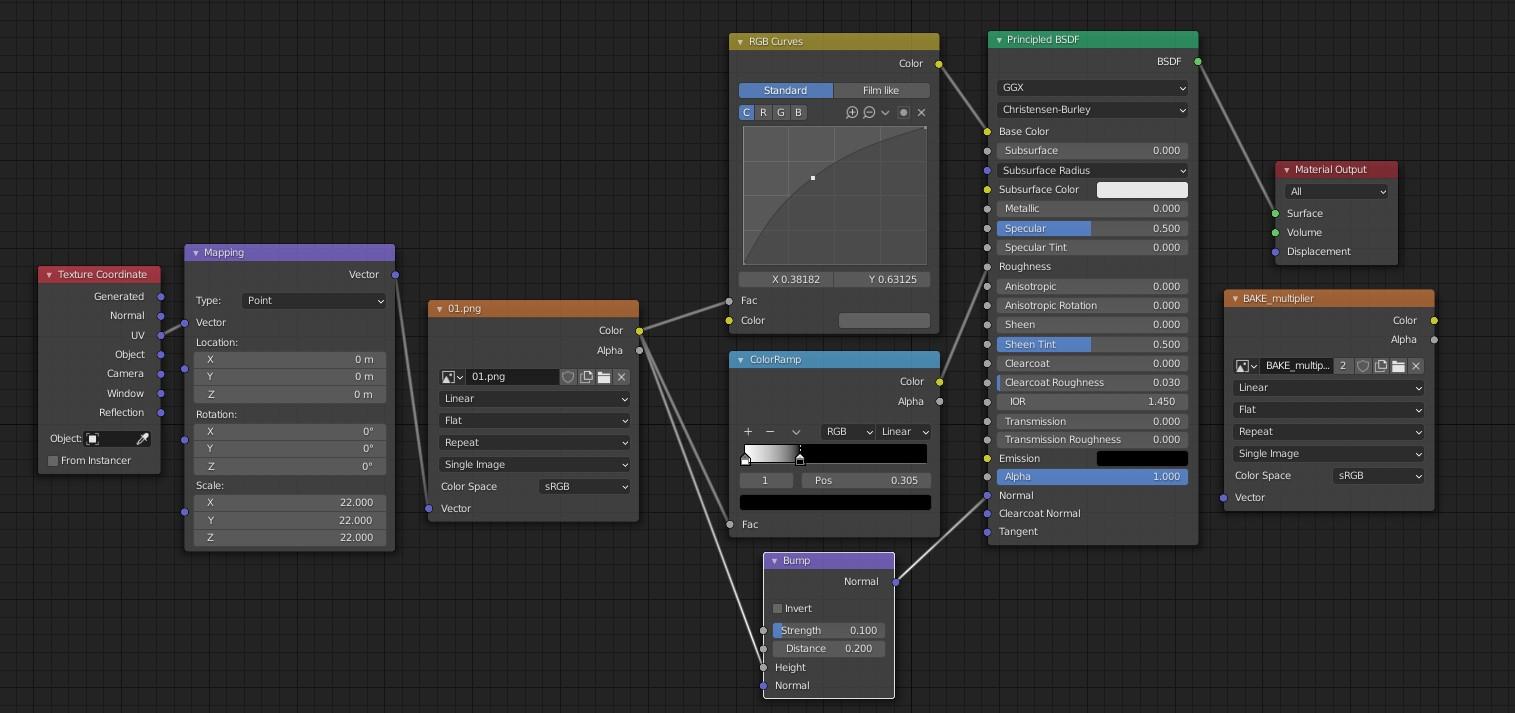
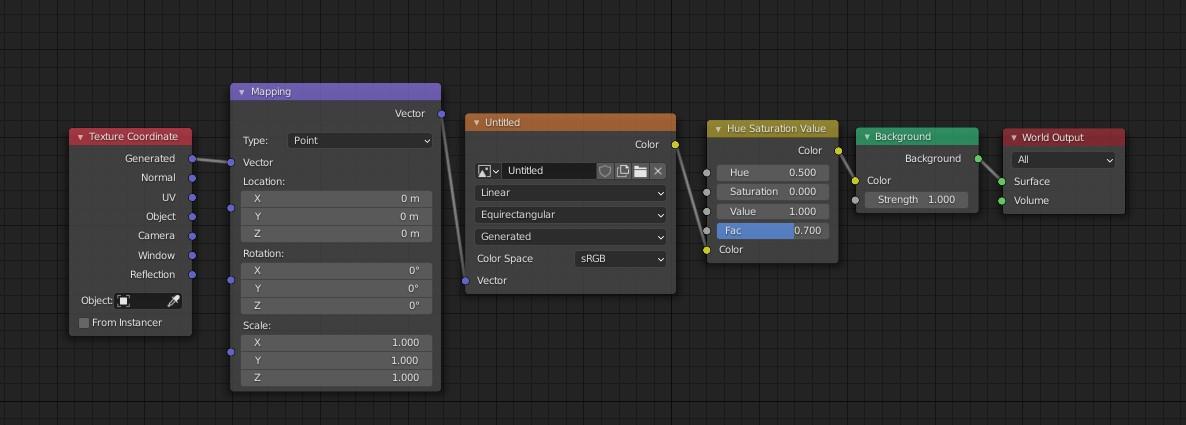
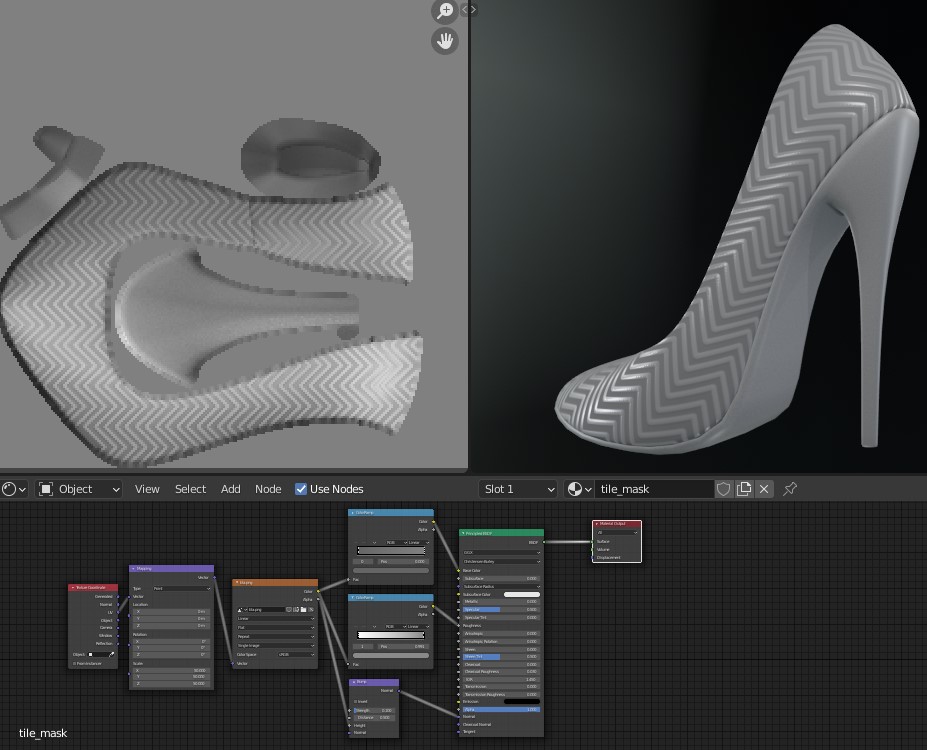
This is the node setup for Viper, nothing spectacular although it worked pretty well for making several textures from a single 512x512 tile.
Some notes:
- The ‘RGB Curves’ node allows two things: changing the image to “neutral gray” using the ‘color’ slot and then modifying the contrast using the curve, more or less like photoshop does
- The ‘ColorRamp’ node, when connected to the ‘roughness’ was used to determine which sections of the texture where shiny or opaque, also I used it for the mask (not showed here) because you can add your own colors in this case I use it to change the dark scales to red and the bright to yellow:
This is the node setup for the environment texture (aka hdri):

- I used the ‘Hue Saturation’ node to make the hdri “gray” by moving the saturation to 0, this is because an hdri not only provides light information but also color and for this game your textures must be grayish
-
And finally I also reduced the
‘factor’* because initially the resulting texture was a little bright, ‘dds dxt1/dxt3‘ compression introduces artifacts when dealing with high contrast and small details
*what needs to be reduced is the ‘strength’ on the ‘background’ node
-
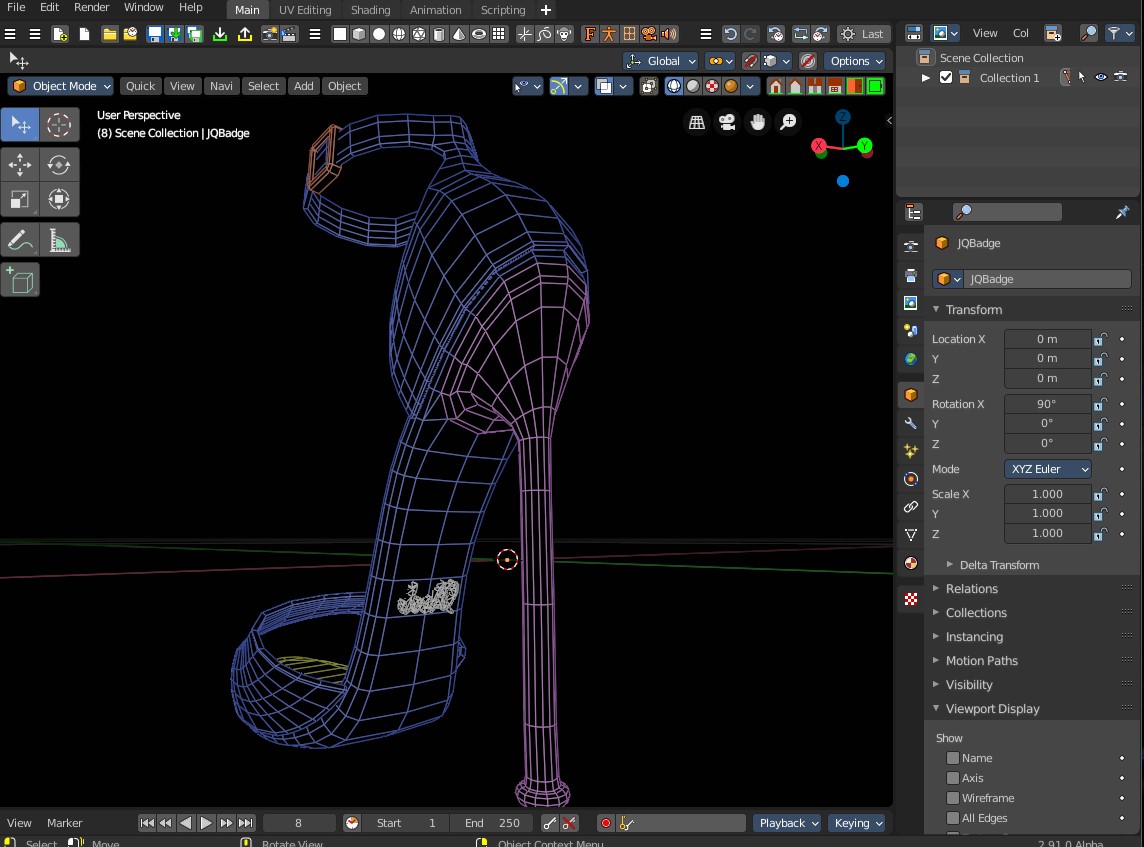
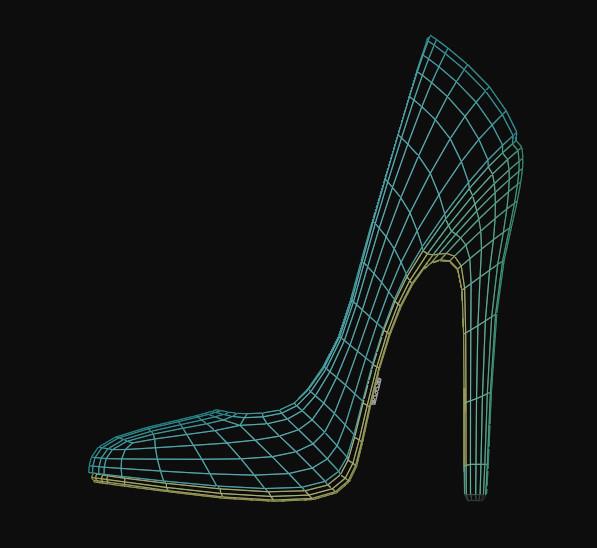
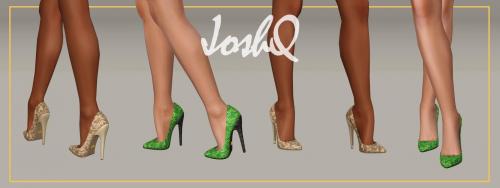
View File Impossible Heels ‘Viper’ This CC is completely free You’re allowed to modify it in any way, shape or form imaginable; you don’t need to ask me for permission I don’t take requests nor commissions Details: Base game compatible For teen, young adult and adult femsims Enabled for everyday, sleepwear, formalwear, career, outerwear and validformaternity Disabled for random sims All LODs and morphs Polycount: LOD1=5986; LOD2=1466 4 color channels Will add 6 “units” to adult and young adult’s height, 5 to teens Only available as .package Defects: Shoes look “weird” on CAS, in-game looks fine Too bright/dark colors look awful Potential clipping with floor and furniture also misalignment on animations, poses and interactions between sims Pants might clip around the ankle Clipping and bending behind the ankle depending on custom animation (normal simming is ok) 3D accessories that contain morphs, like necklaces, might deform shoes and feet Notes: A “simple” design that allows a slightly bigger UV isle and that reduces texture blurring (kinda) Viper’s texture, specular, normalmap and mask were originated from a single 512x512 tiled image mixed with nodes, lamps and an environmental image; with all this I was able to add basic volume, shadows and highlights to the final result Originally I wanted to use one of the leather patterns from the game but the scales were barely visible, maybe it’s because Sims 3 uses 256x256 patterns Talking about patterns, you can mix them with the texture for interesting results, it just requires more work with the color wheel “Fun fact”: generating the textures took a lot more time than modeling the shoes… Compatible with the default body, MedBod and any other custom body mesh that follows the original leg seam Submitter JoshQ Submitted 09/15/2020 Category Shoes
-
265 downloads
This CC is completely free You’re allowed to modify it in any way, shape or form imaginable; you don’t need to ask me for permission I don’t take requests nor commissions Details: Base game compatible For teen, young adult and adult femsims Enabled for everyday, sleepwear, formalwear, career, outerwear and validformaternity Disabled for random sims All LODs and morphs Polycount: LOD1=5986; LOD2=1466 4 color channels Will add 6 “units” to adult and young adult’s height, 5 to teens Only available as .package Defects: Shoes look “weird” on CAS, in-game looks fine Too bright/dark colors look awful Potential clipping with floor and furniture also misalignment on animations, poses and interactions between sims Pants might clip around the ankle Clipping and bending behind the ankle depending on custom animation (normal simming is ok) 3D accessories that contain morphs, like necklaces, might deform shoes and feet Notes: A “simple” design that allows a slightly bigger UV isle and that reduces texture blurring (kinda) Viper’s texture, specular, normalmap and mask were originated from a single 512x512 tiled image mixed with nodes, lamps and an environmental image; with all this I was able to add basic volume, shadows and highlights to the final result Originally I wanted to use one of the leather patterns from the game but the scales were barely visible, maybe it’s because Sims 3 uses 256x256 patterns Talking about patterns, you can mix them with the texture for interesting results, it just requires more work with the color wheel “Fun fact”: generating the textures took a lot more time than modeling the shoes… Compatible with the default body, MedBod and any other custom body mesh that follows the original leg seam -
Simple masks can be done a lot quicker (and precise) using Blender too.
You can do the same for the alpha (white over black canvas) and save it separately, then you can use DXTBmp, GIMP, Photoshop, etc. to join them and create a 4 channel mask.
-
338 downloads
This CC is completely free You’re allowed to modify it in any way, shape or form imaginable; you don’t need to ask me for permission I don’t take requests nor commissions Details: Base game compatible For teen, young adult and adult femsims Enabled for everyday, sleepwear, formalwear, career, outerwear and validformaternity Disabled for random sims All LODs and morphs Polycount: LOD1=9153; LOD2=2336 4 color channels, 2 variations Will add 9 “units” to adult and young adult’s height, 8 to teens Only available as .package Defects: Shoes look “weird” on CAS, in-game looks fine Texture looks “grainy” at full zoom Extremely dark or light colors will look awful Potential clipping with floor and furniture also misalignment on animations, poses and interactions between sims Pants might clip around the ankle Clipping and bending behind the ankle depending on custom animation (normal simming is ok) 3D accessories that contain morphs, like necklaces, might deform shoes and feet Notes: Compatible with the default body, MedBod and any other custom body mesh that follows the original leg seam -
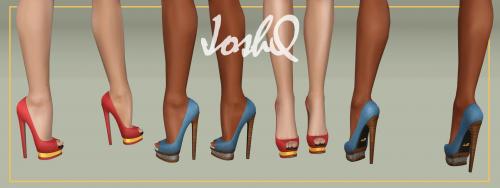
View File Impossible Heels ‘Peach’ This CC is completely free You’re allowed to modify it in any way, shape or form imaginable; you don’t need to ask me for permission I don’t take requests nor commissions Details: Base game compatible For teen, young adult and adult femsims Enabled for everyday, sleepwear, formalwear, career, outerwear and validformaternity Disabled for random sims All LODs and morphs Polycount: LOD1=9153; LOD2=2336 4 color channels, 2 variations Will add 9 “units” to adult and young adult’s height, 8 to teens Only available as .package Defects: Shoes look “weird” on CAS, in-game looks fine Texture looks “grainy” at full zoom Extremely dark or light colors will look awful Potential clipping with floor and furniture also misalignment on animations, poses and interactions between sims Pants might clip around the ankle Clipping and bending behind the ankle depending on custom animation (normal simming is ok) 3D accessories that contain morphs, like necklaces, might deform shoes and feet Notes: Compatible with the default body, MedBod and any other custom body mesh that follows the original leg seam Submitter JoshQ Submitted 09/03/2020 Category Shoes
-
View File Accessory Heart Choker N02 This CC is completely free You’re allowed to modify it in any way, shape or form imaginable; you don’t need to ask me for permission I don’t take requests nor commissions Details: Base game compatible For teen, young adult and adult femsims Located in accessory category, earrings slot Enabled for everyday, sleepwear, formalwear, swimwear, career, outerwear and validformaternity Disabled for random sims All LODs and morphs Polycount: LOD1=2098; LOD2=864 3 color channels Only available as .package Defects: The game “downgrades” textures and patterns from 3D accessories, normally happens when you use two or more (selection order might influence) Extremely dark or light colors will look awful Clipping on the base of the neck depending on animation, is mostly unnoticed under normal simming except on some custom animations Accessories with morphs interfere and deform every.single.pair of Impossible Heels, instead I made ‘Fixed Size’ versions that separately adapts to the thin, medium and fat morph; you can install any combination without problems Notes: Compatible with the default body, MedBod and any other custom body mesh that follows the original neck shape Submitter JoshQ Submitted 09/03/2020 Category Accessories
-
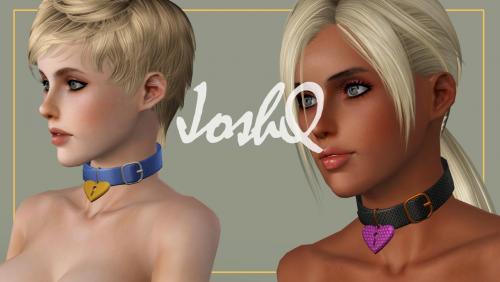
932 downloads
This CC is completely free You’re allowed to modify it in any way, shape or form imaginable; you don’t need to ask me for permission I don’t take requests nor commissions Details: Base game compatible For teen, young adult and adult femsims Located in accessory category, earrings slot Enabled for everyday, sleepwear, formalwear, swimwear, career, outerwear and validformaternity Disabled for random sims All LODs and morphs Polycount: LOD1=2098; LOD2=864 3 color channels Only available as .package Defects: The game “downgrades” textures and patterns from 3D accessories, normally happens when you use two or more (selection order might influence) Extremely dark or light colors will look awful Clipping on the base of the neck depending on animation, is mostly unnoticed under normal simming except on some custom animations Accessories with morphs interfere and deform every.single.pair of Impossible Heels, instead I made ‘Fixed Size’ versions that separately adapts to the thin, medium and fat morph; you can install any combination without problems Notes: Compatible with the default body, MedBod and any other custom body mesh that follows the original neck shape